A Survey of Life Drawing Method
In this brief course, as well as practicing technical aspects of drawing, we're surveying some basic exercises within the life drawing method. Each drawing exercise we do allows us to see the subject and our world differently. The way we see in the drawing exercises is different from how we normally see the world on a day to day basis, which is cursory and practical, and each exercise allows us to see the world differently than the another exercise. The drawing exercises focus on aspects of our visual perception and allow us to practice seeing as through a strange lens. We can take what we learn from these exercises and apply them to our personal drawing style. In fact, when you draw according to an exercise you will find that aspects of the drawing exercise might spill over unconsciously into your standard drawing approach.
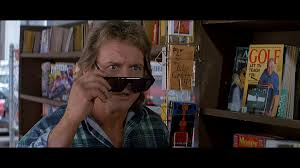
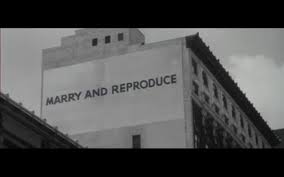
These drawing exercises are a lot like looking through different lens at the world and your subject, or, like looking through various strange goggles that each allow us to see the world differently. Another metaphor for the exercises might be that each exercise that we do is like taking a drug that allows us to see the world differently. But lets stick with the goggles, as drugs are mostly illegal and will prevent us from operating heavy machinery. A fun comparison might be the unusual sunglasses found by the unemployed drifter called Nada (played by Roddy Piper) in the 1988 horror sci-fi movie 'They Live', which, when looked through allows him to see the world very differently. Although the glasses show the world in black and white, they also reveal the subliminal messages behind advertising and mass media. As well, he can see parasitical aliens living among us who, along with rich or powerful human collaborators, are subtly manipulating the average earthling to do their will. Mayhem ensues... The drawing exercises probably won't reveal anything quite as dramatic, but I do hope they reveal interesting things for you.
These drawing exercises are a lot like looking through different lens at the world and your subject, or, like looking through various strange goggles that each allow us to see the world differently. Another metaphor for the exercises might be that each exercise that we do is like taking a drug that allows us to see the world differently. But lets stick with the goggles, as drugs are mostly illegal and will prevent us from operating heavy machinery. A fun comparison might be the unusual sunglasses found by the unemployed drifter called Nada (played by Roddy Piper) in the 1988 horror sci-fi movie 'They Live', which, when looked through allows him to see the world very differently. Although the glasses show the world in black and white, they also reveal the subliminal messages behind advertising and mass media. As well, he can see parasitical aliens living among us who, along with rich or powerful human collaborators, are subtly manipulating the average earthling to do their will. Mayhem ensues... The drawing exercises probably won't reveal anything quite as dramatic, but I do hope they reveal interesting things for you.

Feeling, Looking and Thinking
If we take a general life drawing session, or class, the poses start short and gradually get longer. The short poses are impulsive, rapid responses to what we see. The exercises we do with this quick poses emphasise feeling; in a dynamic and directional sense. As the poses get longer we can start seriously looking in a tactile sense; touching and following form meticulously with our eyes. Finally, in the long poses we'll have a bit of time for thinking; considering relationships between angles and parts of the figure as well about light and shade playing on form. Each week we will move through exercises that are quick and rudimentary to ones that are more sustained and complex. As the poses get longer, expression will be sacrificed for accuracy and embellishment.
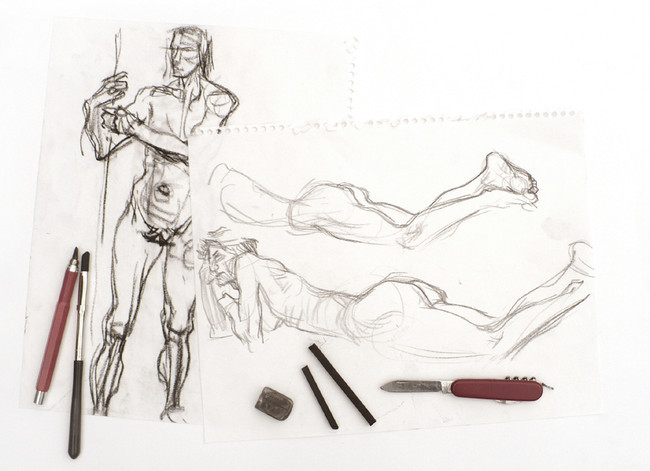
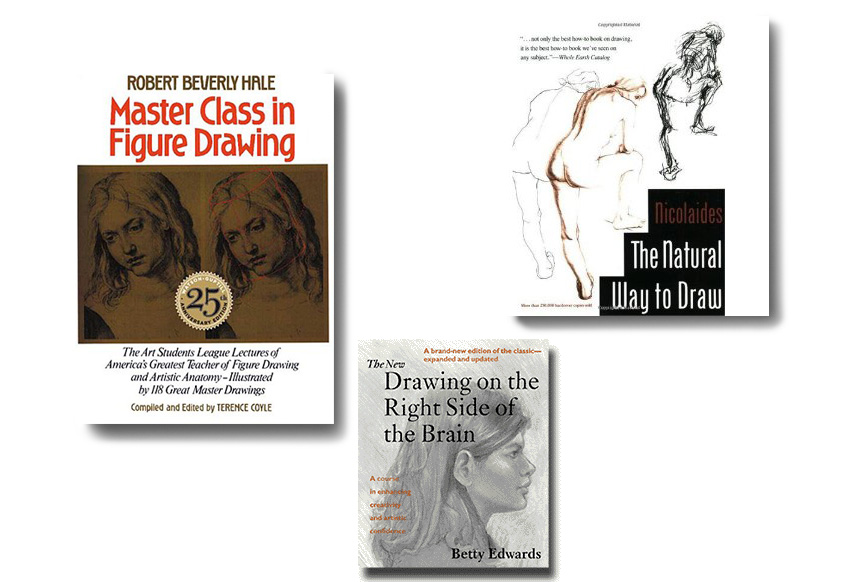
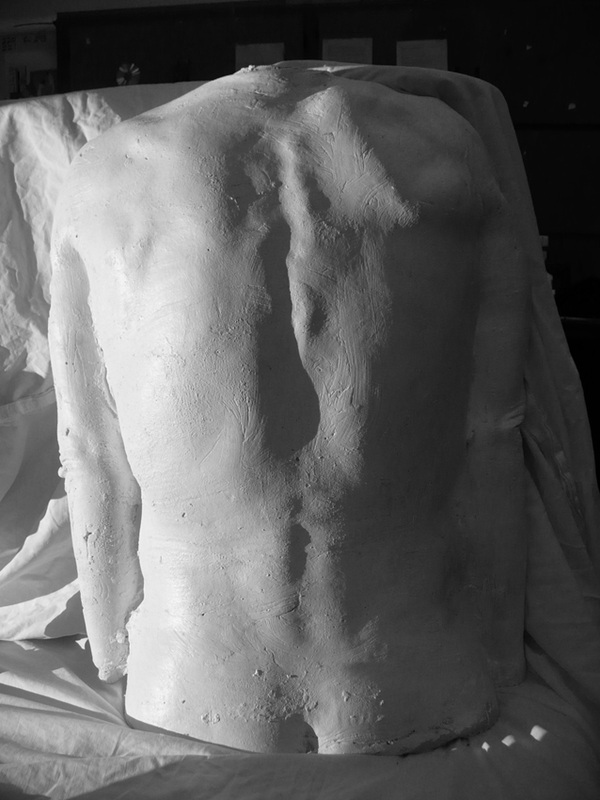
When I studied drawing and painting at art college I learned drawing method mainly using nude models. The human body is the best place to start drawing seriously, and a subject to return to again and again. As a student I used most of the techniques and exercises that you will find in this short survey course, and will also find in books on drawing. I found three books particularly valuable and complimentary in my own review, study and preparation for offering drawing classes. The Natural Way to Draw by Kimon Nicolaides stresses hard work through exercises and practice; putting in time to improve skills. Drawing on the Right Side of the Brain by Betty Edwards stresses a state of mindfulness in exercises that present a more playful counterpoint to the gruelling regime prescribed by Nicolaides and offer the promise of a perceptual shortcut. Personally, I don't think we can rely on short cuts to eliminate the hard work required to learn how to draw well, but I'll take anything that I think might help! A trusty and inspirational companion for years to come can be found in Master Class in Figure Drawing by Robert Beverly Hale. We will have too little time to give human anatomy the attention it deserves, but Hale's book is useful reference for a study of the basic anatomyand is full of wonderful master drawings.
If we take a general life drawing session, or class, the poses start short and gradually get longer. The short poses are impulsive, rapid responses to what we see. The exercises we do with this quick poses emphasise feeling; in a dynamic and directional sense. As the poses get longer we can start seriously looking in a tactile sense; touching and following form meticulously with our eyes. Finally, in the long poses we'll have a bit of time for thinking; considering relationships between angles and parts of the figure as well about light and shade playing on form. Each week we will move through exercises that are quick and rudimentary to ones that are more sustained and complex. As the poses get longer, expression will be sacrificed for accuracy and embellishment.
When I studied drawing and painting at art college I learned drawing method mainly using nude models. The human body is the best place to start drawing seriously, and a subject to return to again and again. As a student I used most of the techniques and exercises that you will find in this short survey course, and will also find in books on drawing. I found three books particularly valuable and complimentary in my own review, study and preparation for offering drawing classes. The Natural Way to Draw by Kimon Nicolaides stresses hard work through exercises and practice; putting in time to improve skills. Drawing on the Right Side of the Brain by Betty Edwards stresses a state of mindfulness in exercises that present a more playful counterpoint to the gruelling regime prescribed by Nicolaides and offer the promise of a perceptual shortcut. Personally, I don't think we can rely on short cuts to eliminate the hard work required to learn how to draw well, but I'll take anything that I think might help! A trusty and inspirational companion for years to come can be found in Master Class in Figure Drawing by Robert Beverly Hale. We will have too little time to give human anatomy the attention it deserves, but Hale's book is useful reference for a study of the basic anatomyand is full of wonderful master drawings.
Drawing as Imaging and Imagining
Before we start drawing, which is an an ancient form of graphic visualization, lets have a quick look at drawing in relation to some of the modern technologies we use to create images.
Developing an ability to draw doesn't require a wide variety of materials. Cheap paper. Lots of it. Crayons or pencils. materials, it is relatively immediate, has no dire need for crutches such as programs or projections, and connects the eye to the mind to the hand. It provides an immediate and engaging 'way of seeing'. It is interesting to see how other artists percieve the figure and body. Every artist has their own unique way of seeing the world and understanding the drawing process. Each machine technology has it's unique way of seeing subjects. As we can learn from how other artists 'see' we can also learn from how machines 'see'.
We are all familiar with cameras, which are mostly digital now. Cameras take pictures of the world as we think we see it, however if you read the 'introduction to all drawing courses' page I hope you are suspicious of that claim for any kind of photography. Cameras make a view of the world that seems very even in resolution. This is superficially how our eye's see the world, and how our brains want us to think we see the world. Investigation will show that we aren't really able to see the world or a photograph the way a camera sees.
Machines and humans possibly do things differently. Machines 'image' and humans 'imagine'. There is a grey area between these two ways of creating imagery, and it's becoming greyer as machines become more intelligent and as we become aware of machine-like qualities within ourselves. We can use what we know intellectually to imagine optically unseen structures in a parallel way to how machines allow us to image that which we can't actually (optically) see. Telescopes of various kinds allow us to see deep into space and back in time in a way that would be impossible with our naked eyes. Likewise microscopes allow us to image unseeable smallness.
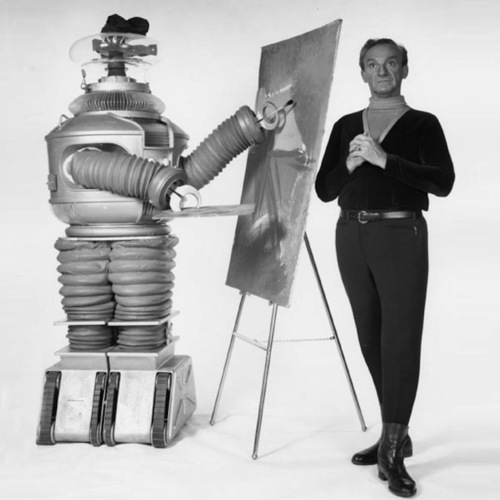
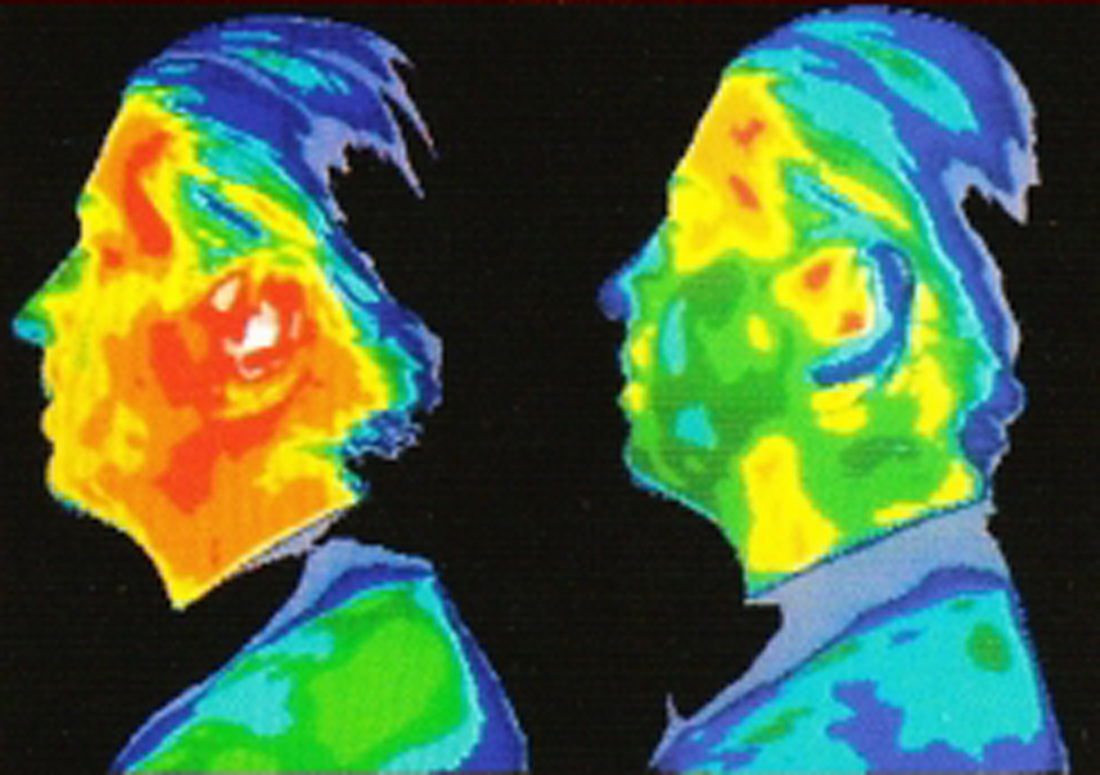
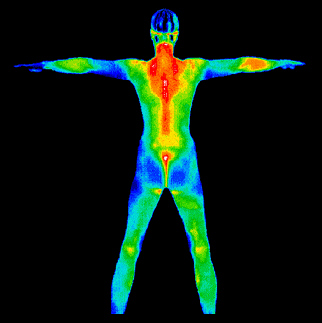
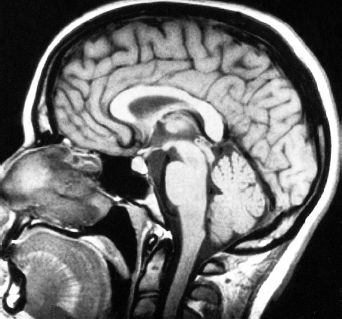
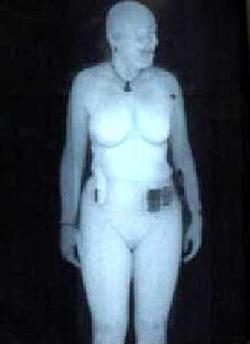
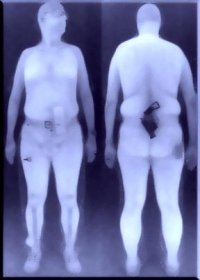
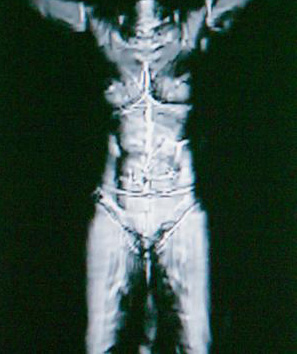
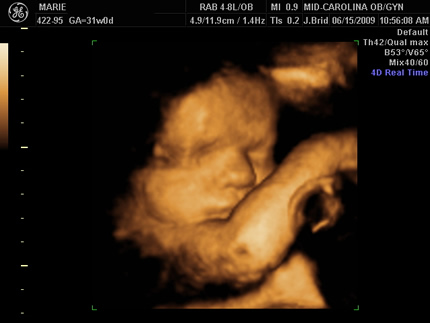
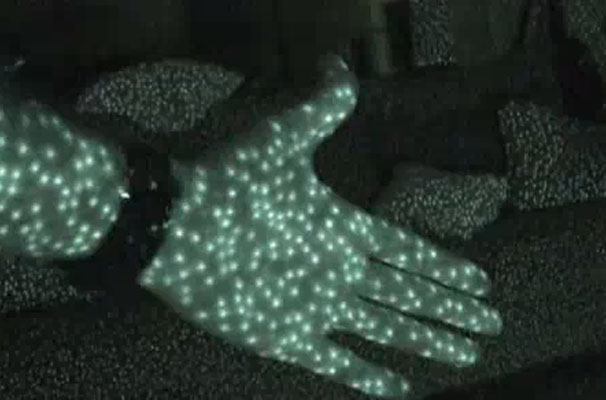
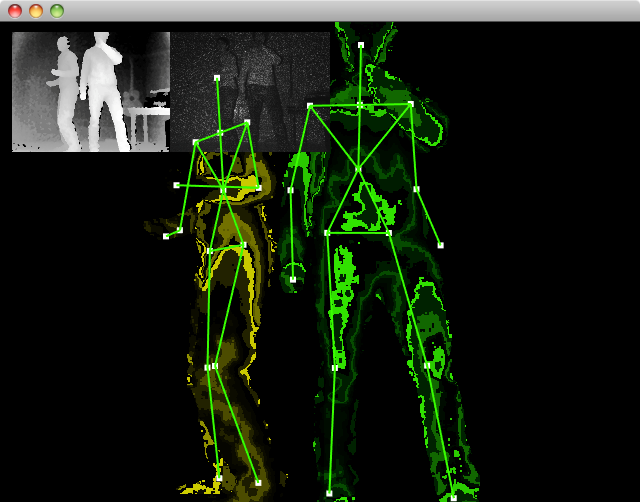
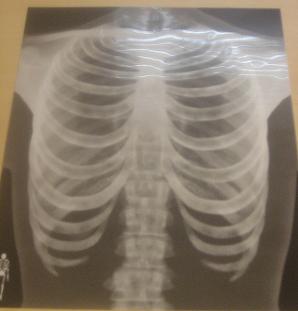
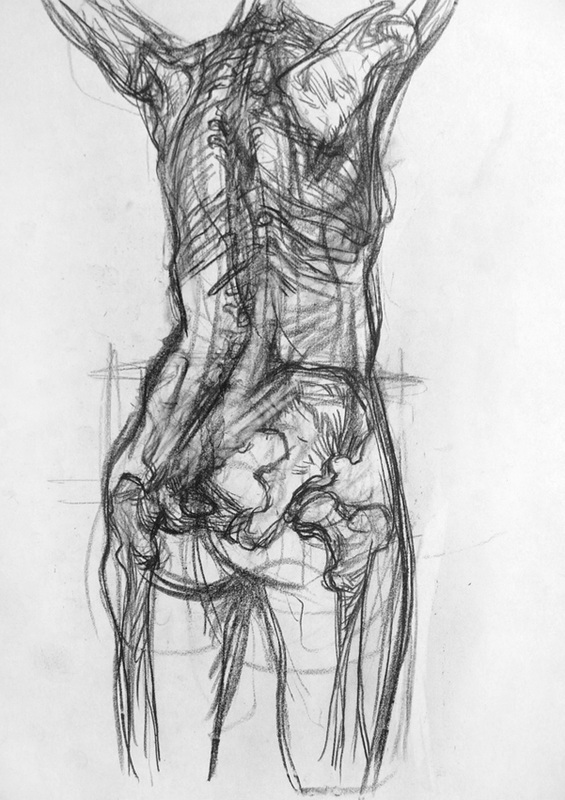
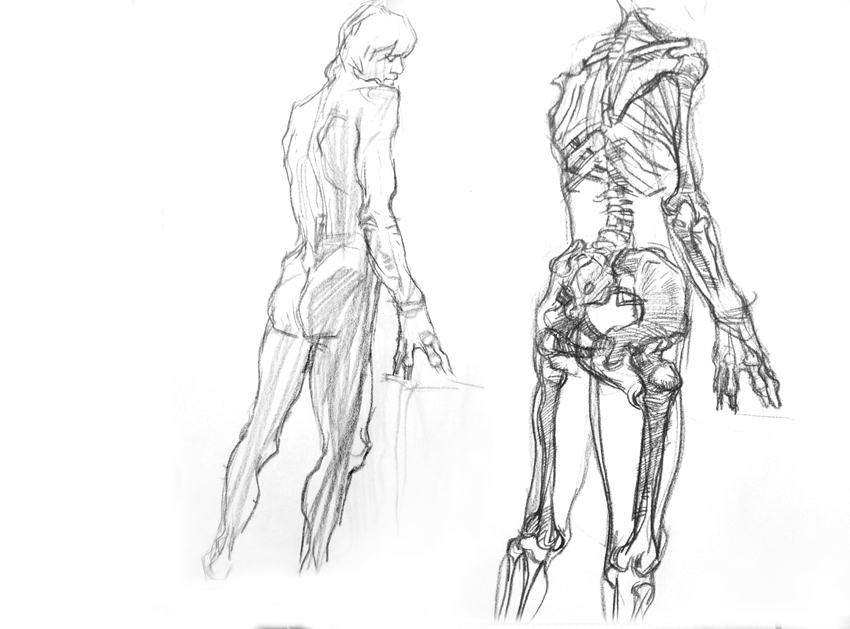
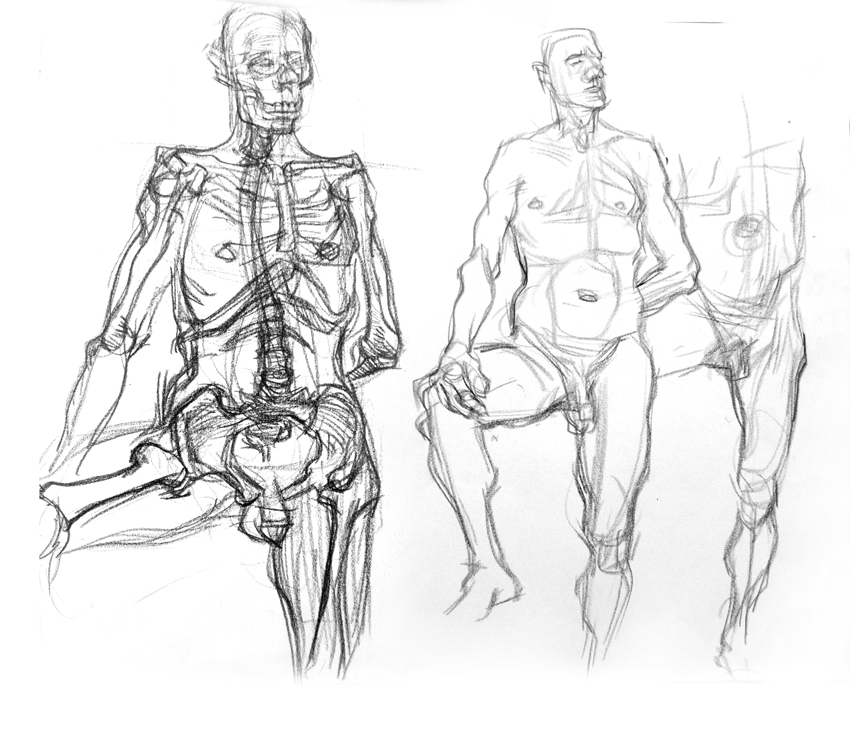
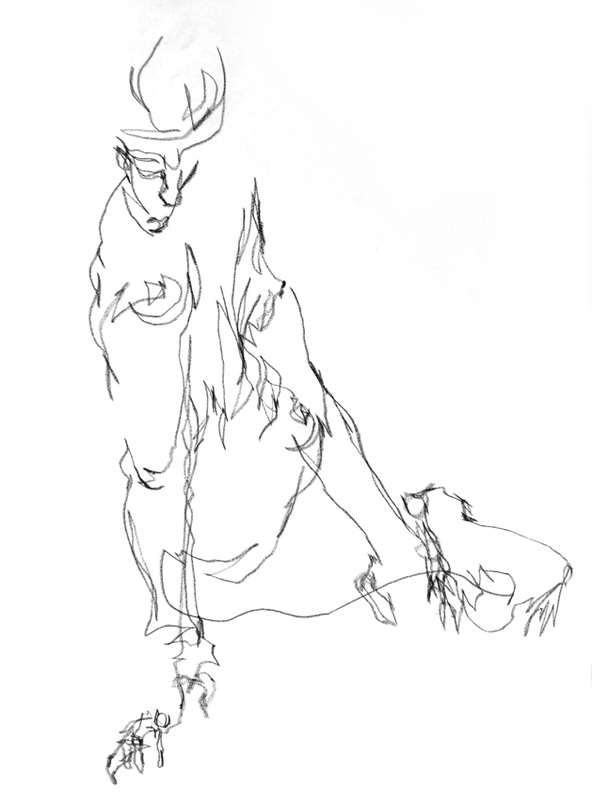
Below are some images gleaned from the internet that illustrate the strange and interesting ways that machines and humans see the world. Speaking of strange and interesting, in the first image Dr. Zachary Smith is drawn by Robbie the Robot while Lost in Space. Photo two shows a photograph taken in Ultraviolet wavelengths, invisible to the human eye but visible to some birds and bees. Next two photos show infra red imaging. Centre of the second row shows a CAT scan, which reveals hidden detail forms in cross sections. The next three photos show images from airport X-ray scanners. These machines are powerful enough to penetrate an eliminate the cloaking effect of clothing but not powerful enough to penetrate skin and reveal anatomy. Third row right shows an ultrasound which basically creates a relief image of a form. More about relief during our drawing course. The first two images of row four relate to how Microsoft Kinect allows a computer to 'see' form and movement. By radiating small infra red beams the sensor or 'eye' can track and delineate form. On the far right of the fourth row we see an medical X-ray, which of course allows machines to image interior 'hard' structures such as bone for interpretation by medical practitioners. Finally, on the last two row we can see representations of interior structures imagined by humans, not imaged by machines. In the second row from the bottom we can see a cave painting of a figure which displays an arbitrary interpretation of interior structures. These aren't accurate. This would have been done from imagination after an actual observation. Although the human brain is very capable at visual recognition of something it has seen previous it has very little capacity for accurate visual recall. So the interior structures outlined by the cave artist are a vague approximation of reality. Careful observation and drawing of interior structures allows an accurate representation of anatomy, as can be seen in the Leonardo drawing and the engraving by Albinus. These employ observation rather than imagination, but an extended study of anatomical structures by an artist will allow them, when drawing from life, to 'see' through the skin to skeletal and muscular forms. By looking closely at 'landmarks' on the skin of a body, an artist's imagination can draw from previous observational study and 'see' with a kind of X-ray vision. The last row of drawings are some of my own in which I have tried to sketch in the skeleton using my previously gained understanding of skeletal form which I can see hints of...the crest of the hips...the bottom of the ribcage...the collar bone and pit of the neck...to imagine interior structures. Imagining vs. the imagining that machines perform.


Drawings are so often 'just' considered to be studies, and not on the pedastal of 'finished' art. However, this apparent dimishment makes them potentially so much more spontaneous, experimental, probing, and studious than a painting. I think this nudges drawing ever so slightly away from the realm of art product and closer to the realm of research and experimentation. I think these qualities can make drawings potentially more interesting and capable of a broader spectrum of expression than painting. A drawing made by an experienced hand, and by an enquiring and informed mind is capable of both imaging and imagining. An artist with a crayon is capable of imaging/imagining a body beneath it's sheath of robes, and then imaging/imagining structures within the body itself that provide it's support. The artist manages this feat in a very different way than an airport scanner or x-ray machine, however parallels exist and it might therefore be valuable for an artist to informally study machine made images.
When you observe the model, try and keep in mind the structures below the skin. The surface, the skin, is full of tell tale landmarks that indicate what is inside. Other landmarks might be useful in establishing correct proportion, but have little or no structural consequence, and need to be understood in that respect. In the drawings above, the known structures inside the body are imagined as a result of studying landmarks on the surface of the body.
This brings us to another fascinating aspect of drawing; line drawing versus surface rendering of light and shade. When we draw with shading, inner structures can only be suggested and implied by topographical landmarks on the skin, as in the drawing below. Compare this drawing with the line drawings above which are able to more implicitly suggest inner structures. When you work with line drawing, you are capable of x-ray vision of sorts. Most of our drawing exercises will be with line, partly because we are using shorter poses and will have no time to carefully render light and shade. We'll touch on light and shade in a later session, however, it's worth keeping in mind the great strength of line drawing: x-ray vision that, by using imagination, parallels a machines ability to visualize that which can not be obviously seen.
A Proper Drawing Position
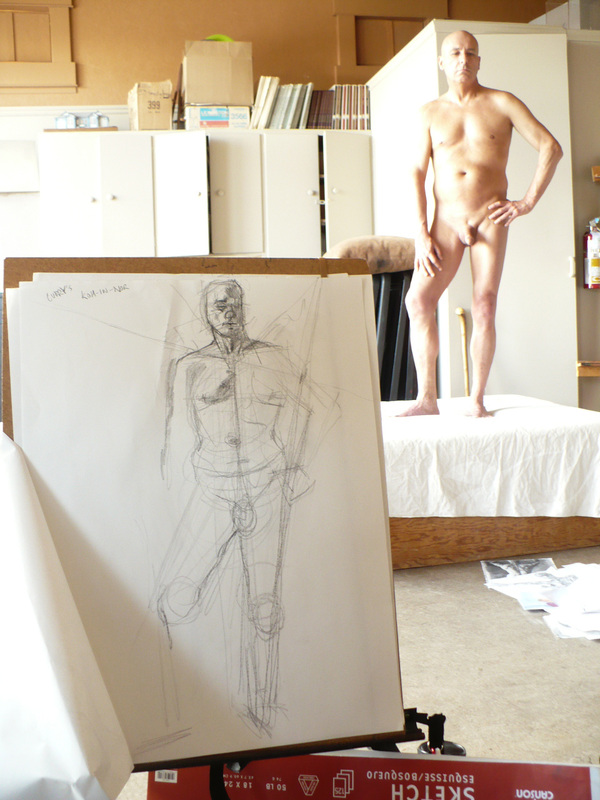
If you lay your drawing board flat on the table and sit down you are going to run into big problems with proportion. You will probably end up with a cephalopodan figure with withering legs and feet. The photo top right attempts to illustrate the effect. When you look 'across' the drawing on the table (top of photo) proportions appear correct. But when you pull the drawing upright it is out of proportion. This is because from your original point of view your drawing is foreshortened. On the right is a superior arrangement, as though drawing from a drawing 'horse'. It's important to be looking as directly at your board as possible. Drawing at an easel provides the best advantage: looking straight at the board with no possibility of distortion as a result of foreshortening of your drawing. At an easel your drawing and your subject can be side by side and this helps with measuring angles and proportions and allows you to step back and make direct comparisons with your subject. Sitting at a table can be improved if you prop the board on your knees and lean it against the table. Position yourself to be able to look at your drawing and the figure just beyond with as little movement of the head so that you can compare angles and proportions easily.
Subject Placement on the Page
Before you actually start measuring angles and proportions you need to place your subject on the page. A good way to assist with this is as you might through the viewfinder of a camera. You can make a view finder with your hands, as below. Imagine, in advance, your subject on the page, placed in a way that is interesting and/or pleasing. Should your picture frame be oriented 'portrait' or 'landscape'?

Measuring Angles and Proportions
Now lets see how we can, in a sense, 'project' what we see on to our page...

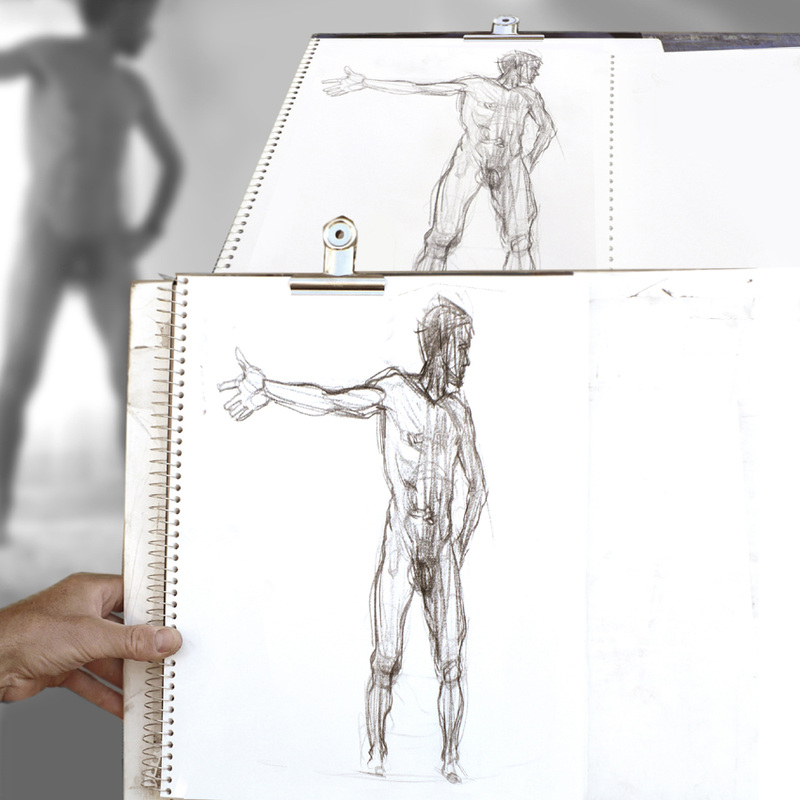
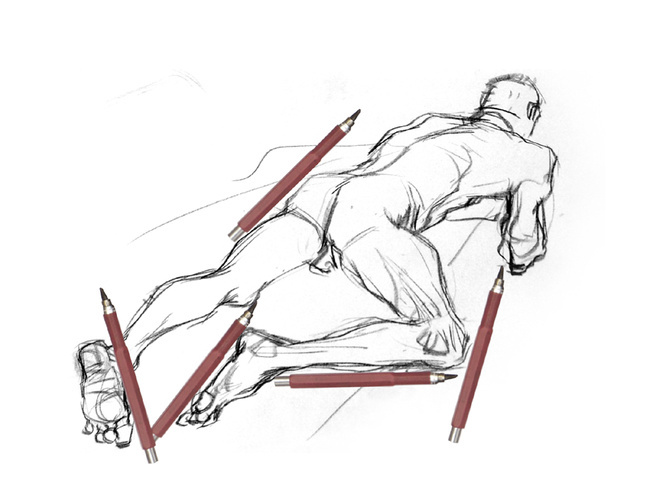
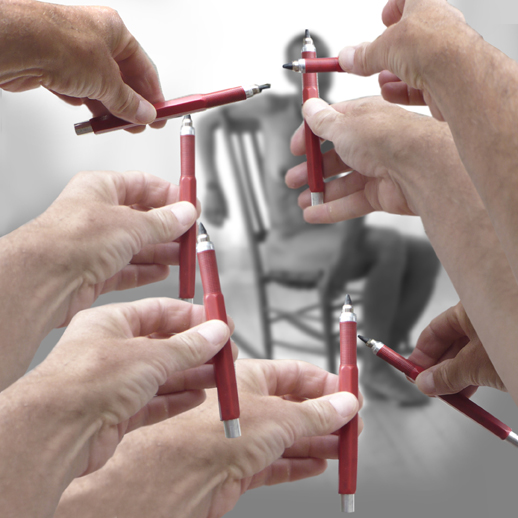
The measuring of angles can be done by holding your pencil or crayon holder along the angle you are observing with arms straight and elbows locked; look for perpendicular lines behind your subject and roughly observe the angle of what you intend to draw. Swing your arm down to your board and paper and roughly measure the angle you have taken note of on your paper as you draw. All of the hands in the above image except the two top right are measuring angles on parts the figure. In the image below you can see how you might transfer those angles onto your paper as straight lines.
Measure one part of the body against another by again, extending your arm, locking your elbows and placing the tip of your pencil at one end of the 'basic unit' that you intend to measure and your thumb down the pencil shaft at the other end. The two top right hands are measuring the height of the head and also it's width. Keeping your arms straight and elbows locked, you can now swing your arms and measure how many head heights or head widths another body part, or indeed the whole figure, might be. Roughly measuring the height of the figure in heads before you actually start drawing will help you place your figure on the page where you would like it. You can lightly rough in your measurements before you start drawing, or you can start drawing and then check your measurements.
Measure one part of the body against another by again, extending your arm, locking your elbows and placing the tip of your pencil at one end of the 'basic unit' that you intend to measure and your thumb down the pencil shaft at the other end. The two top right hands are measuring the height of the head and also it's width. Keeping your arms straight and elbows locked, you can now swing your arms and measure how many head heights or head widths another body part, or indeed the whole figure, might be. Roughly measuring the height of the figure in heads before you actually start drawing will help you place your figure on the page where you would like it. You can lightly rough in your measurements before you start drawing, or you can start drawing and then check your measurements.
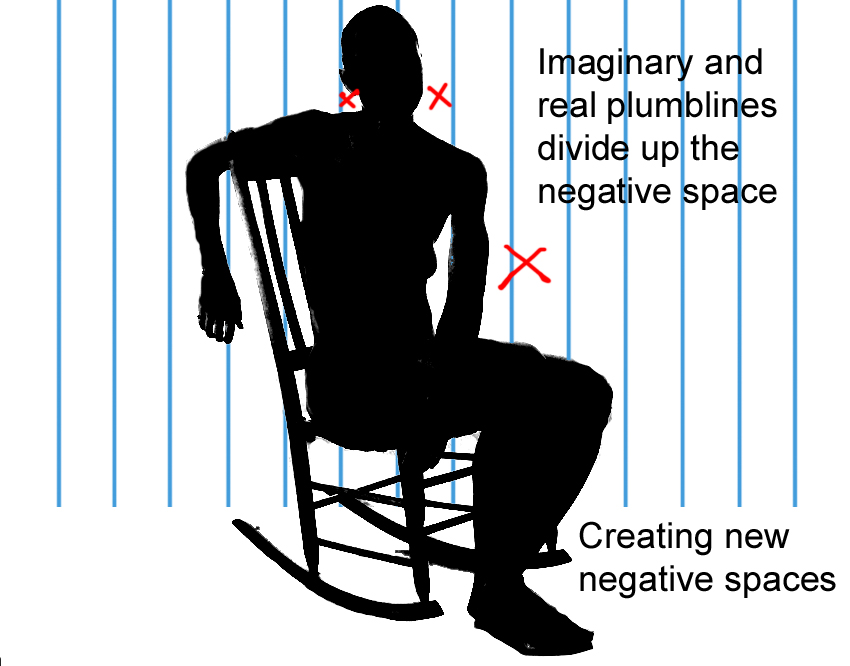
As well as paying attention to measuring the angles of shapes and outline on and in the figure, also use eyeballing to measure the angle of negative shapes created by body appendages, as well as the background objects behind your model. If we were able to put our model on a platform with a grid taped on the wall behind them, we would find it very useful. There are also perpendicular corners of the room we're in, door jambs, windows, wall moulding and trim, as well as easels and even other course participants. Look closely at the shapes they make around your figure and use them to help ensure accuracy.

Of course, eyeballing is useful for drawing and painting more than just the figure. How many times have you seen experienced painters struggle with the angle of buildings desperate to create convincing perspective? Holding a brush or pencil up makes perspective angles obvious. Generally, your perpendiculars will appear constant when observing on location.
Often experienced painters struggle with the perspective angles on shorelines. Generally there is a habit of painting not what we see but what we know. We know the shoreline angles off into a bay, even though there is little visual evidence of that in our view, so we 'mistakenly' paint or draw the bay as if we are suspended hundreds of feet above our actual viewpoint.
At ground level it only takes a few hundred yards before all sense of the angle of, a shoreline for example, is lost to the horizontal axis. Again, you can correctly measure the angle of a landscapes components.
When painting a landscape it's not usually necessary to be extremely accurate in our proportions, however, those measurements can be made too. Simply follow the procedure above for measuring one part of your subject against another by initially selecting a 'basic unit' of measurement. This would be especially useful drawing houses and buildings, cars, or views in which a high degree of accuracy and recognition is desired.
The Drawing Exercises:
What follows is a list of drawing exercises with some descriptions and some images of examples of the exercise as well as examples of how the exercise might have been employed outside of a life drawing session, in art or design. Keep in mind that if you are going to community drop-in life drawing sessions you can review these exercises before you go and continue to practice them. By occasionally drawing using the template of these exercises, you might have them continue to inform your standard drawing style.
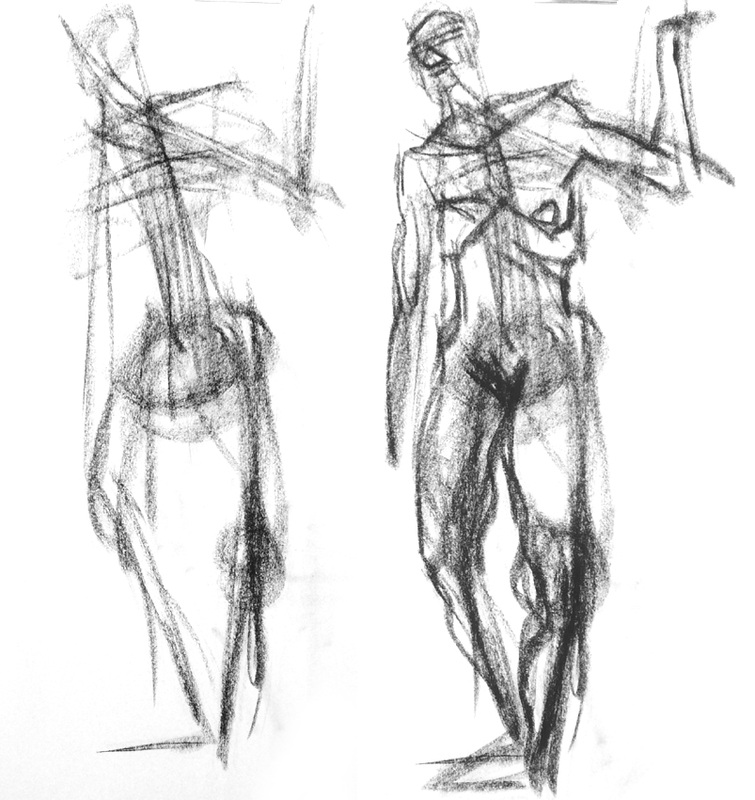
Gesture Drawing
Gesture drawing is an exercise frequently employed by artists to 'warm up'. The poses by the model should be brief and dynamic. They might be from 15 or 20 seconds to two minutes. They are so quick that we have no time to measure angles and proportions as described above, so we will set aside that process until we get into longer poses and constructed drawings.
With gesture you are trying to capture dynamic vectors within the whole figure - the sweep of the torso, the spine or extended legs. Although the model is motionless for the pose, the drawings should reveal latent tension and movement, direction, as though they are about to animate.
Don't fixate on outline. Feel movement, tension and weight both inside and outside of the body outline. Remember to try and fill your page. Although outline is a wonderful way to describe form, and the very best artists employ it stupendously, most people, including myself, tend to ignore the enormous amount of information contained within the outline of the figure.
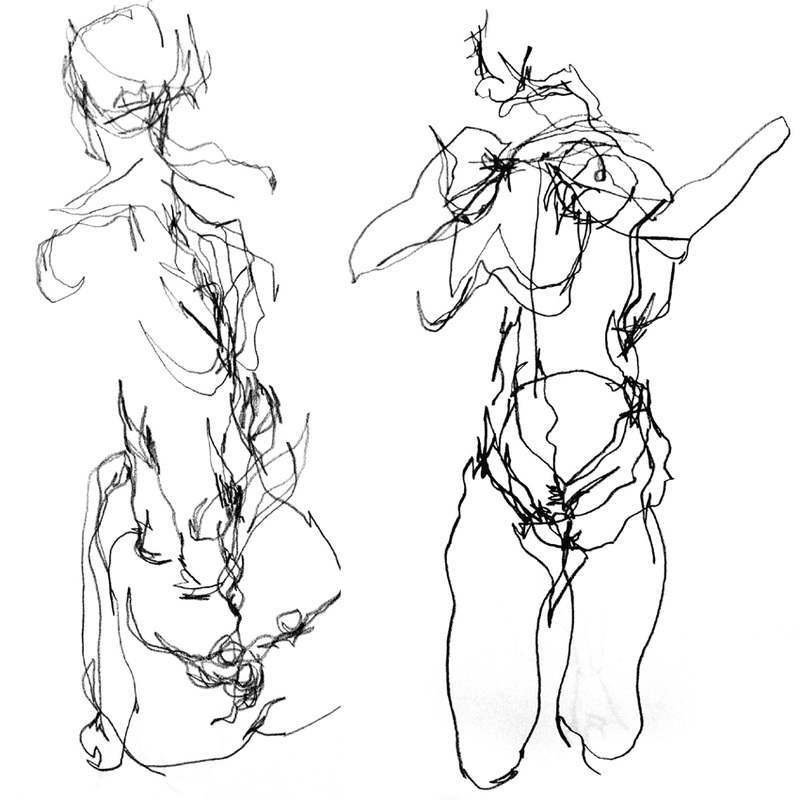
The top two drawings, below, are gestures I've done of a minute or less. These are observably gestural in nature. In the first, virtually no attention is paid to outline. Imagined interior structures such as spine and supportive bones are alluded to. Weight has unconsciously been suggested on the weight bearing leg by pressing harder and darker on the crayon. Although the model struggles to remain still for the pose, they often move slightly, and meanwhile the artist also struggling to delineate the figure, creating a 'swarm' of linear vectors which also inadvertently suggest movement or latent movement. It's like a long exposure on a photograph in which the subject moves and the image blurs as individual moments are made vague or obscured by the passing of time. In the second top drawing some energy has gone into trying to describe the form. Lines wrap vaguely around the torso, cluster and wrap the knees, and even describe some outline.
In the bottom two drawings we can see how two gesture drawings might develop. On the left side of each other is the 'gesture' at about a minute. On the right, after a couple of minutes, we can see the gesture becoming a drawing. The figures on the right still contain kernels of the original gesture, but they are now becoming developed drawings.
It's worth considering that, even if you were doing a 3 hour pose, it might help your finished product to do a couple of gestures to try and dynamically describe the form of your subject. On your final gesture you could work very lightly so that as you embellish the drawing the gesture can keep a low profile but continue sending you information about the dynamic aspects of the pose. You can also apply gesture to inanimate objects even, doing quick gestural sketches of still life arrangements, landscape, or from classic figurative paintings or paused film.
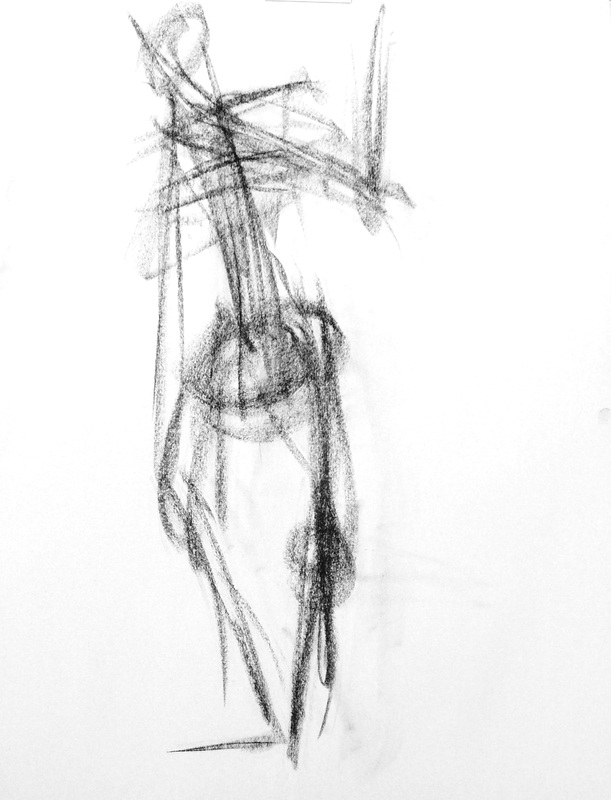
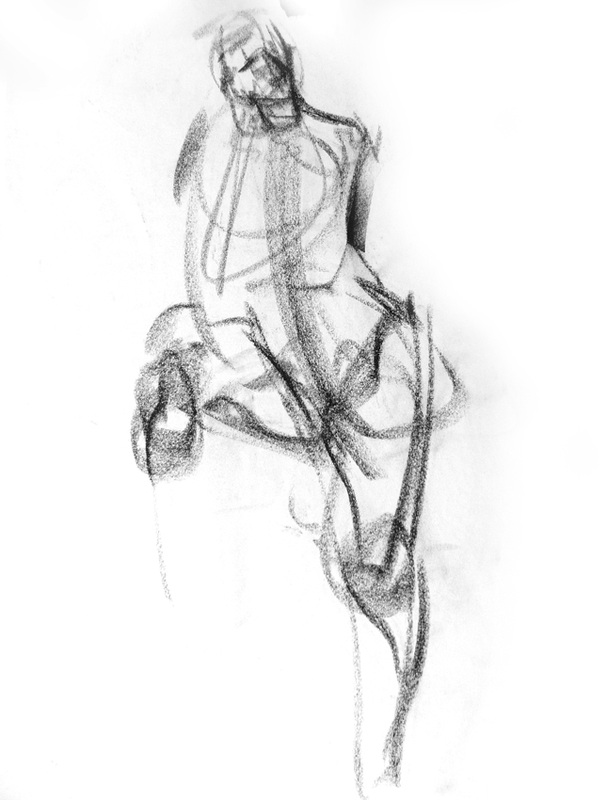

Blind Contour Drawing
One problem we will all encounter when sitting down to draw from life is that we will tend to worry about about our pencil or crayon and what's going on when it makes marks on the paper. We can get so preoccupied with this concern, and the results that might be happening under our nose, that we stop looking intently at our subject. If you have managed to wade through the rambles under INTRODUCTION TO ALL DRAWING COURSES or haven't fallen unconscious during the class you'll be aware that I am stressing and re-stressing how little we actually see. We need all the concentration for observation we can possibly muster in order to draw well, and blind contour drawing will improve, sharpen and 'warm up' your observational skills. We'll need a five or a ten minute pose for this one.
In order to prevent peeking and looking down at your paper, I would like you to draw underneath the sheet on the top of your pad of paper. Stare at your model. Draw your model by concentrating on their topography; very slowly and very carefully move your pencil over the paper following the curves and dips on the model's form. Hey! Don't peek underneath! Naughty! You can even imagine that your pencil is touching the model and following their topography. Try not to tickle them. Don't just follow the outline! Look at the vast amount of topographical information inside the outline of the form.
As well as helping us to focus on looking at the model (so much so that your eyes should tear up a bit) this exercise does another extraordinary thing. Think back to our thought experiment at the beginning of the class and how we made a mental map of the dark room. In an imagined mental space we 'drew' vectors that described our travels in the room, stoppages in complex areas, and we populated that mental space with vaguely described objects that we 'saw' through feeling with our hands. Well, the second page we are drawing on is a little bit like the mental map in our heads. As well as staring at the model and acquiring information to construct the invisible drawing that may as well be in our heads, we are desperately trying to imagine the two dimensional space we can't see and place our figure on it. In our minds eye we imagine where we start on the page, imagine where we drew the face, imagine where the chest must be, arms the legs. We are imagining our drawing blindly while we are using our hands to draw.
When I was a student I never gave this exercise the credit that is due it. Now that I'm older and very aware of my limitations, I love to do it, and if I arrive at drawing and find I am completely off my game with the gestures and producing rubbish, I'll do a couple of blind contours to try and regain focus and vision. It usually works.
Below are some of my own blind contour drawings.
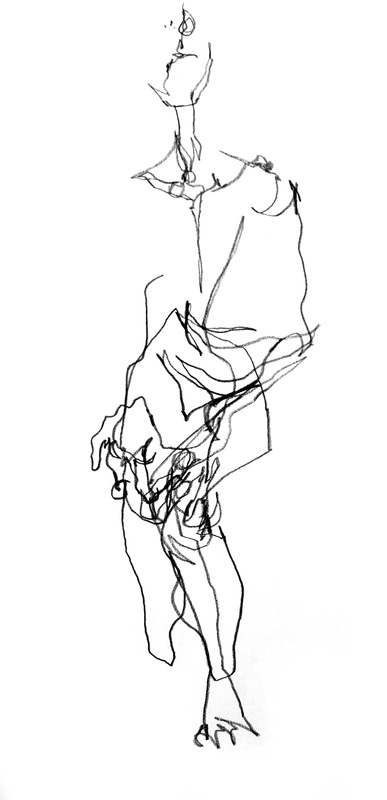
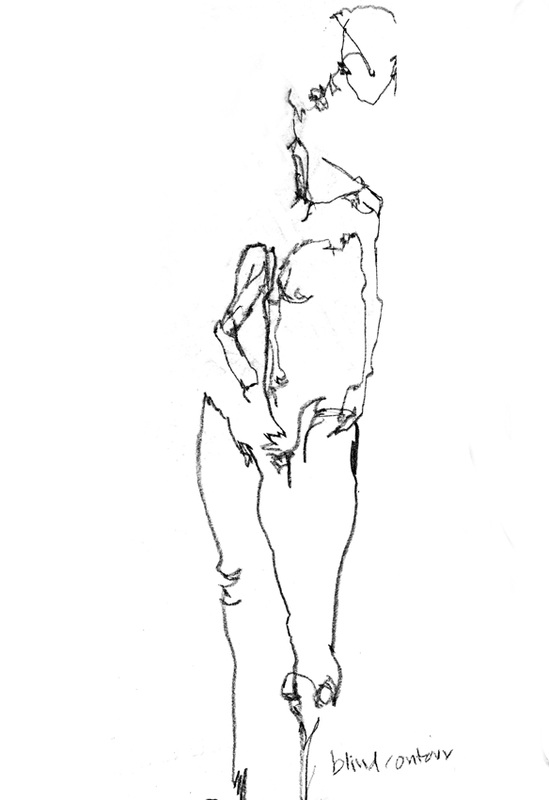
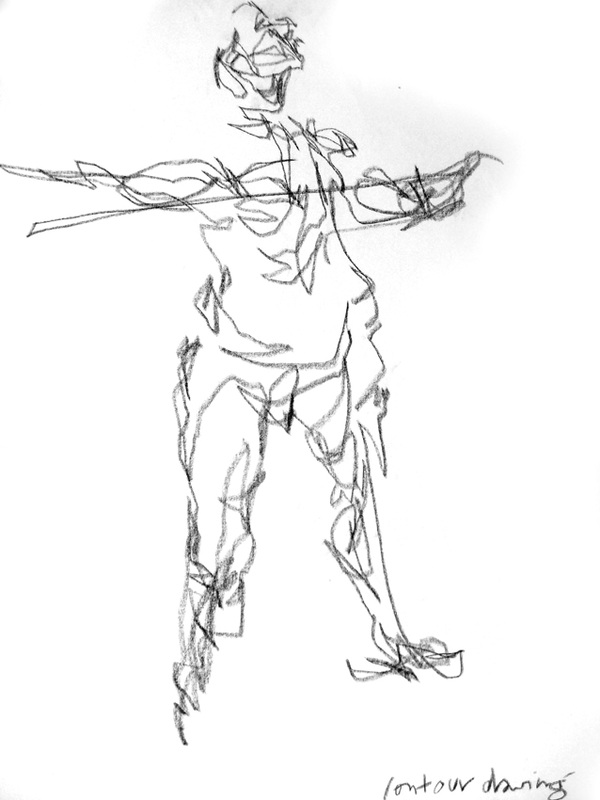
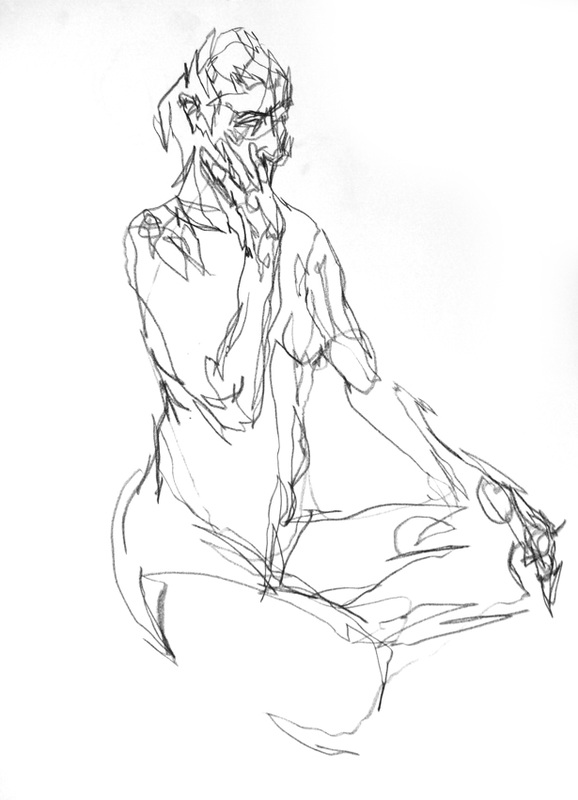
Contour Drawing
Having done blind contours we might allow ourselves to do a contour drawing in which we look down at the page occasionally to make sure we are doing a better job of correct proportions. But don't allow yourself to be too distracted by what is going on with your hand, your crayon, and the paper. There will be plenty of opportunities to fixate on those actions. This is still an exercise to enhance your facility to 'see' in a 'tactile' way. As usual I will implore you not to fixate on looking at, and responding to, the outline of the figure. Use your crayon to feel your way around the landmarks on the interior areas of the figure. Your line quality will change somewhat according to your mood, your degree of energy, and of course the type of crayon or pencil that you're using.
The top two drawings show a couple of my own regular contour drawings.
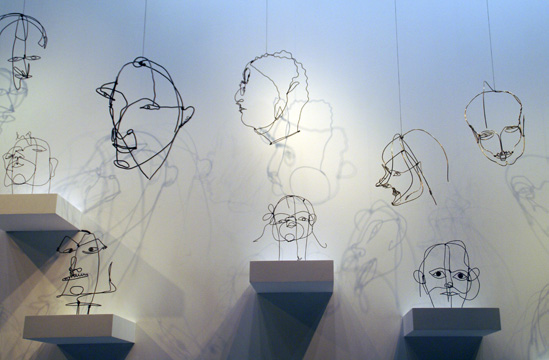
Contour drawing, like many of the exercises, can insinuate it's way into your standard drawing style. This can often be true when you are sketching madly and trying to look and take in information from your subject. Here's a few examples of wonderful art that utilizes contour like line work. On the left is drawing/sketch by John Gould. The drawing appears quickly done. You can see part of the drawing is offset against other parts, making it somewhat distorted. The offset lines provide a kind of reiteration of the forms of the face and shoulders, perhaps suggesting movement. This offsetting also suggests intense study of the sort we do in contour drawing by Gould. It is as though he is transfixed by his subject enough to only look down at his drawing occasionally and check to see if his crayon is in synch with his vision. Each time he looks down he recalibrates the drawing causing the slight offsetting. This is a fine practical example of the second, 'un-blind' contour drawing exercise. Gould has done some simple modelling with the side of his crayon as well as using line. The middle drawing by Chloe Piene does something similar, perhaps a little more blind drawing and/or whimsy involved. It's hard to know exactly how her process unfolded, but it probably involved an understanding of classic contour drawing. Finally, far left, are some lovely wire sculptures by Alexander Calder. They are almost like three dimensional drawings. The are worth looking at closely to help implant the idea, while drawing contours, of wrapping line around form.

Cross Contour Drawing
This exercise is similar to regular contour drawings, however, but we describe the form with arbitrary grid patterns. Rather than following the ridges and gully's created by bones and muscle we pass our line across them, wrapping the figure in a wire-like mesh.
You might like to lightly sketch an impression of your figure in before you actually start making your 'wireframe' construction.
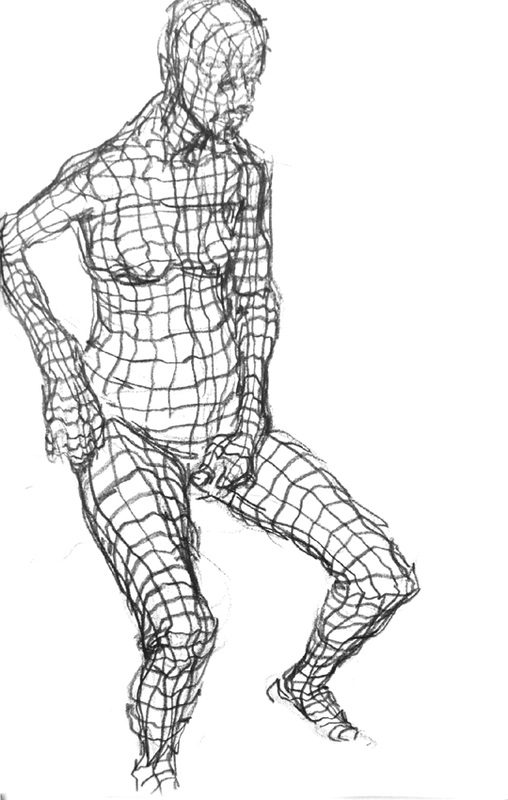
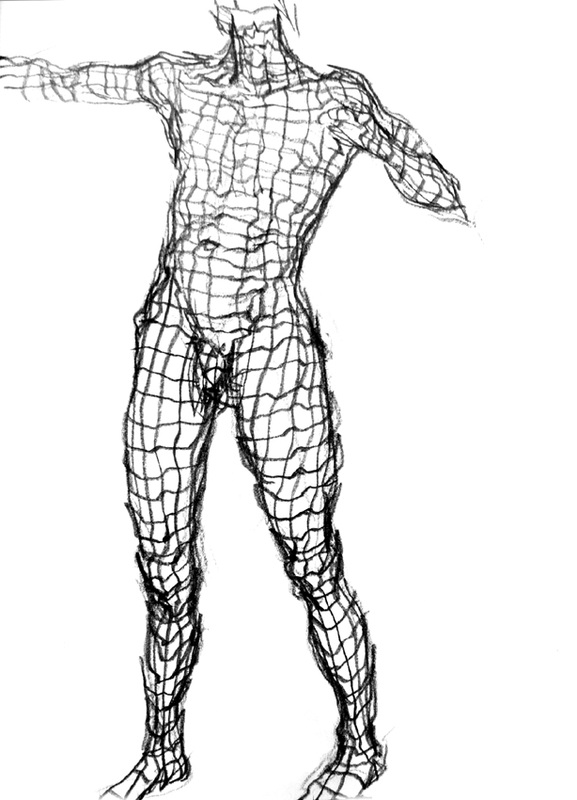
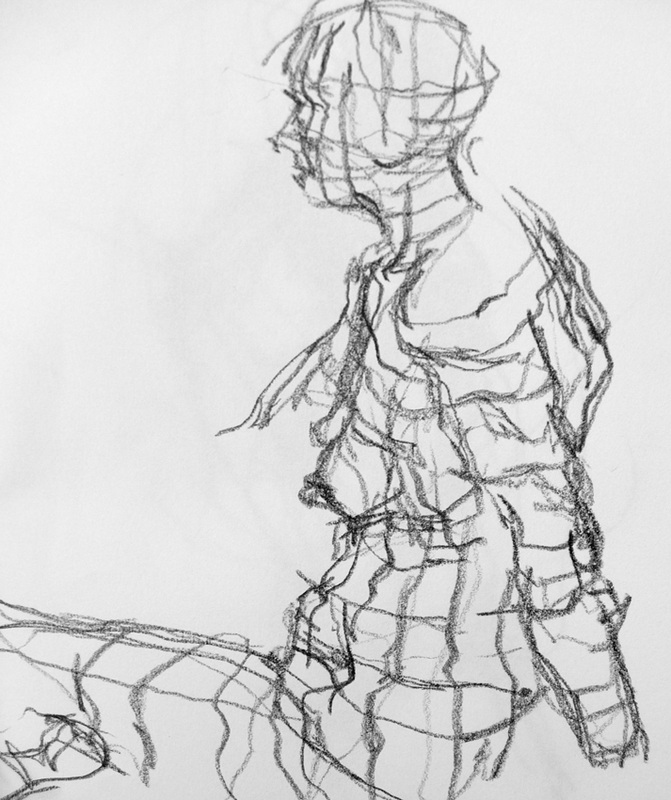

This exercise continues to make us acutely aware of topography and form. It also connects us with the idea of perspective grids and also wire frame computer models. Below lets see some examples of imagery that could be considered related.
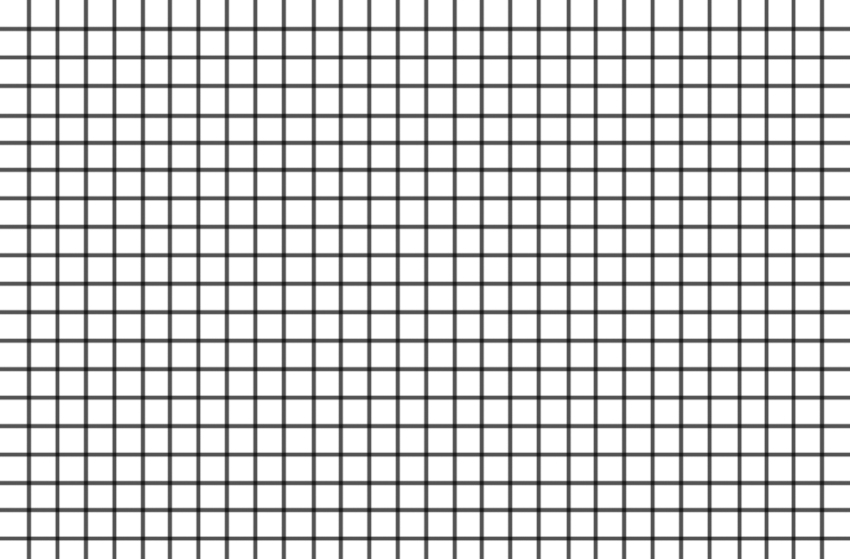
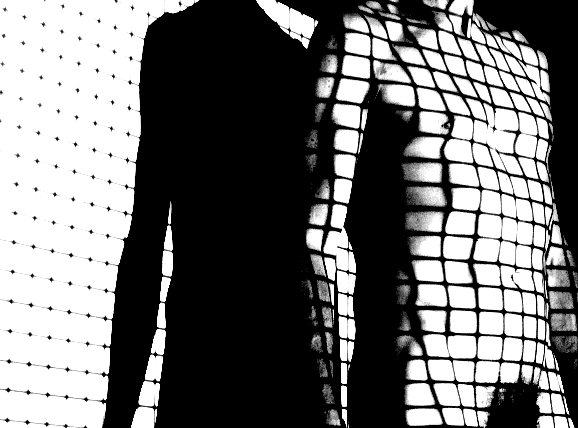
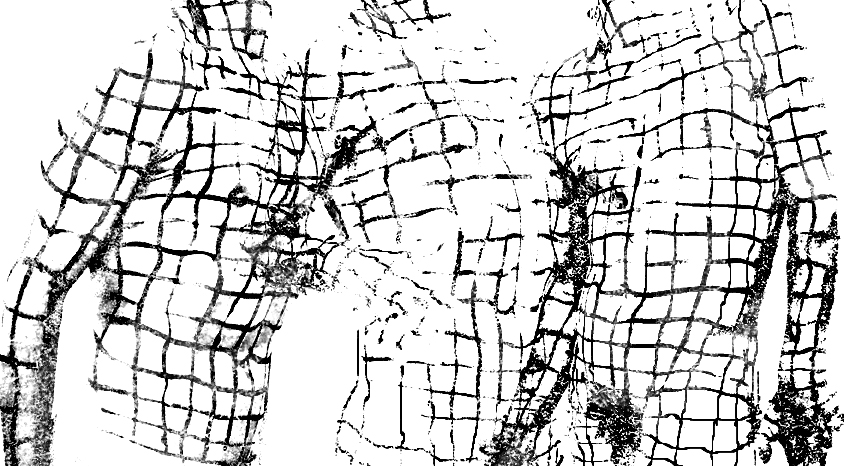
Top left we have an obvious grid. If we were to project the grid on a figure we'd get something similar to the middle picture. We get a cross contour drawing of sorts on the figure care of the projection. If you look closely you can see how the grid lines fluctuate to accommodate the subtle topography of the form. On the far right we have what look like three contour drawings of a figure. However, they are actually a photos of a model with a grid painted on them. The photo was then de-saturated of colour and then the contrast was bumped until it became the equivalent of a cross contour drawing. You can again see how the lines describe the dips and rises of the form.
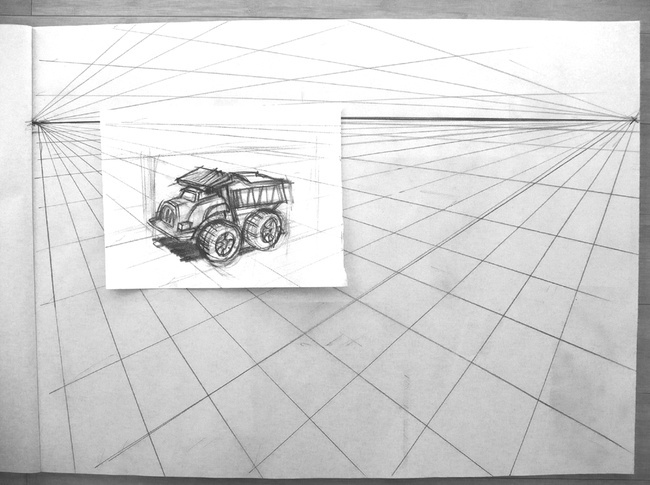
But there is more; as with the actual cross contour drawings above, the lines become closer together as they approach the 'edge' of the form, the outline. In fact, they start to merge together creating an outline drawing of sorts. This is because the edge is the equivalent of a horizon on a perspective grid. If you look at the perspective grid with two vanishing points and the truck at the beginning of the second row, you can see that the latitudinal lines on the grid become closer and closer together as they approach the horizon and foreshortening condenses them. The same effect should happen on the horizon at the edge of your figure.
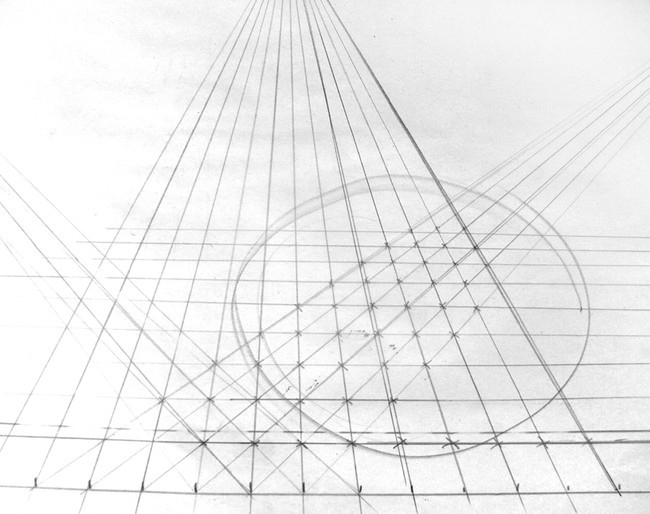
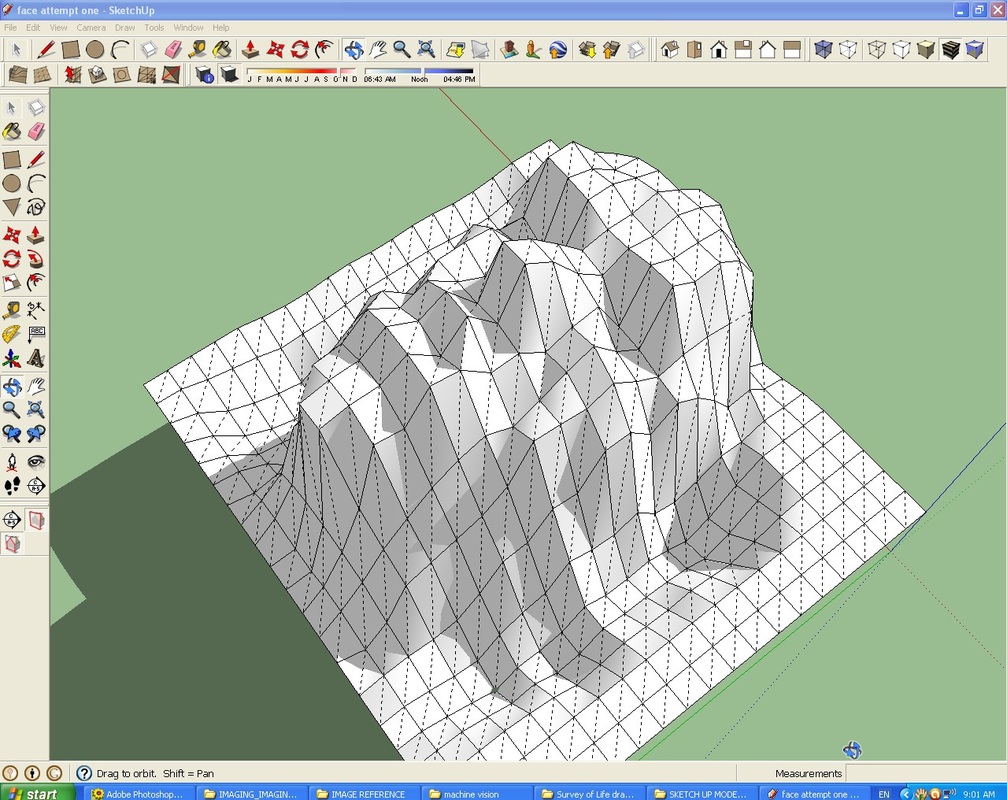
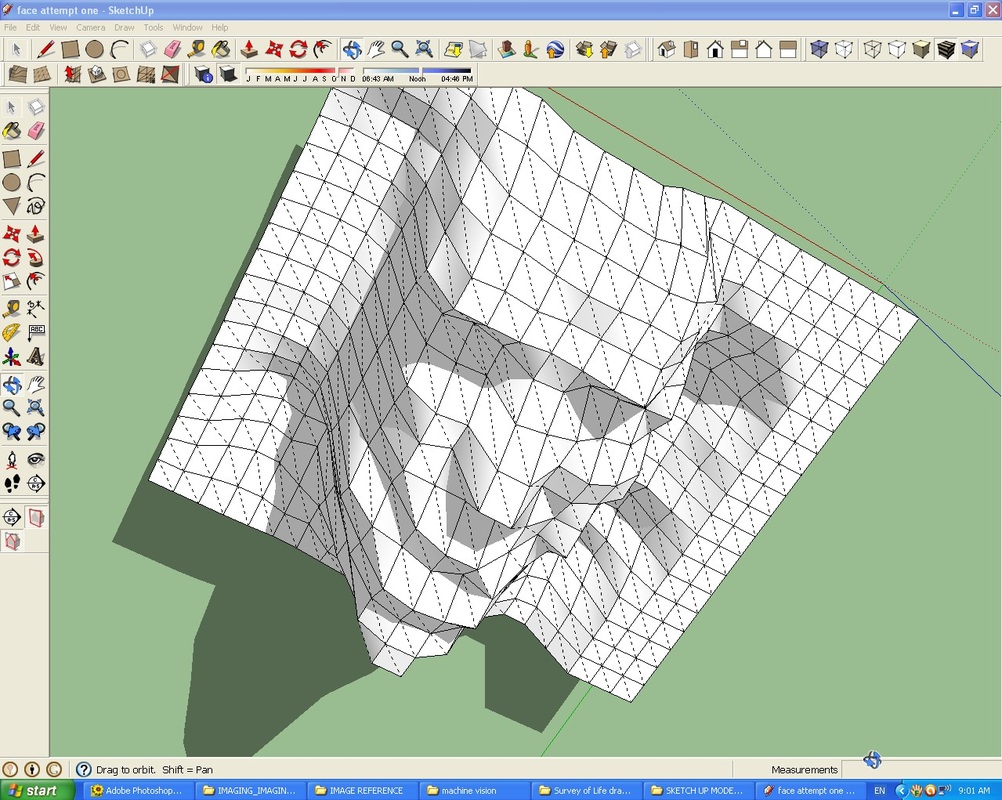
We aren't covering perspective grids and drawings in this class. However you can find a review of perspective under Drawing: The Basics and Drawing for Metal Jewelry Design on this website. But I would just like to show you some grids and computer imagery so that you can see a valuable relationship between perspective drawing, computer modelling and our cross contour drawing exercises. Middle second row is a perspective grid with diagonals drawn in. These diagonals allow for the progressive compressing of the longitudinal grid lines toward the horizon. They provide a second vanishing point on the horizon, or a third if you connect the other two corners. But if you take the drawing with just the squares and the single diagonal, you can see in the example the 'face' modelled in the simple 3D program SketchUp that the linear architecture underlying the model is basically a perspective grid with diagonals drawn in. Our perspective grid, cross contours, underpin most computer architecture in its wireframe form.
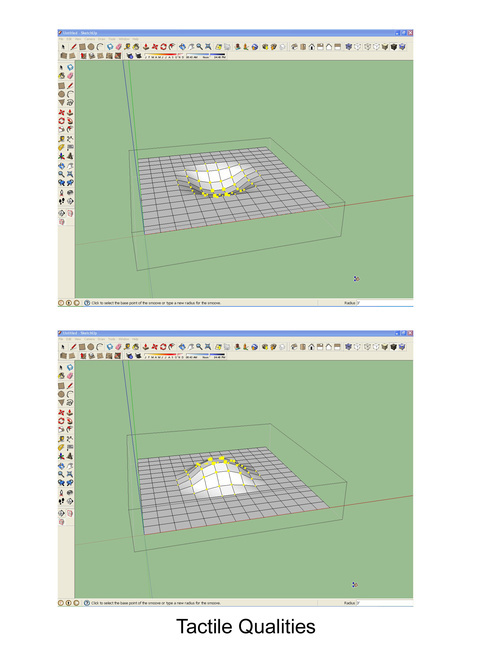
On the final, the third line, you can see how having some understanding of perspective and perspective grids might help you to place a figure in space or on a surface. The final two images show how the malleable perspective grid, or surface in SketchUp can be pushed and pulled and modelled, to some extent, to create form. In doing so, the underlying linear architecture appears to be wrapped around the form similarly to the projected grid and our cross contour exercise drawings.
Top left we have an obvious grid. If we were to project the grid on a figure we'd get something similar to the middle picture. We get a cross contour drawing of sorts on the figure care of the projection. If you look closely you can see how the grid lines fluctuate to accommodate the subtle topography of the form. On the far right we have what look like three contour drawings of a figure. However, they are actually a photos of a model with a grid painted on them. The photo was then de-saturated of colour and then the contrast was bumped until it became the equivalent of a cross contour drawing. You can again see how the lines describe the dips and rises of the form.
But there is more; as with the actual cross contour drawings above, the lines become closer together as they approach the 'edge' of the form, the outline. In fact, they start to merge together creating an outline drawing of sorts. This is because the edge is the equivalent of a horizon on a perspective grid. If you look at the perspective grid with two vanishing points and the truck at the beginning of the second row, you can see that the latitudinal lines on the grid become closer and closer together as they approach the horizon and foreshortening condenses them. The same effect should happen on the horizon at the edge of your figure.
We aren't covering perspective grids and drawings in this class. However you can find a review of perspective under Drawing: The Basics and Drawing for Metal Jewelry Design on this website. But I would just like to show you some grids and computer imagery so that you can see a valuable relationship between perspective drawing, computer modelling and our cross contour drawing exercises. Middle second row is a perspective grid with diagonals drawn in. These diagonals allow for the progressive compressing of the longitudinal grid lines toward the horizon. They provide a second vanishing point on the horizon, or a third if you connect the other two corners. But if you take the drawing with just the squares and the single diagonal, you can see in the example the 'face' modelled in the simple 3D program SketchUp that the linear architecture underlying the model is basically a perspective grid with diagonals drawn in. Our perspective grid, cross contours, underpin most computer architecture in its wireframe form.
On the final, the third line, you can see how having some understanding of perspective and perspective grids might help you to place a figure in space or on a surface. The final two images show how the malleable perspective grid, or surface in SketchUp can be pushed and pulled and modelled, to some extent, to create form. In doing so, the underlying linear architecture appears to be wrapped around the form similarly to the projected grid and our cross contour exercise drawings.

Down below are some more images related to cross contour drawing. Forgive my excitement about cross contours. I think my enthusiasm for contour drawing in general is related to my enthusiasm for line as a way of describing form. Shading and modelling are interesting too, of course, but there is something about the economy of line that makes it visually persuasive. In a way it is an economy of data providing a largess of information, because the line is a vector. As in computers, it is almost as though our brains can process the lower amounts of information provided in vector imagining more easily than we can process the massive amount of data required for an optical or pixelated image. Line is clean, lucid and economical and our brains fill in the gaps.
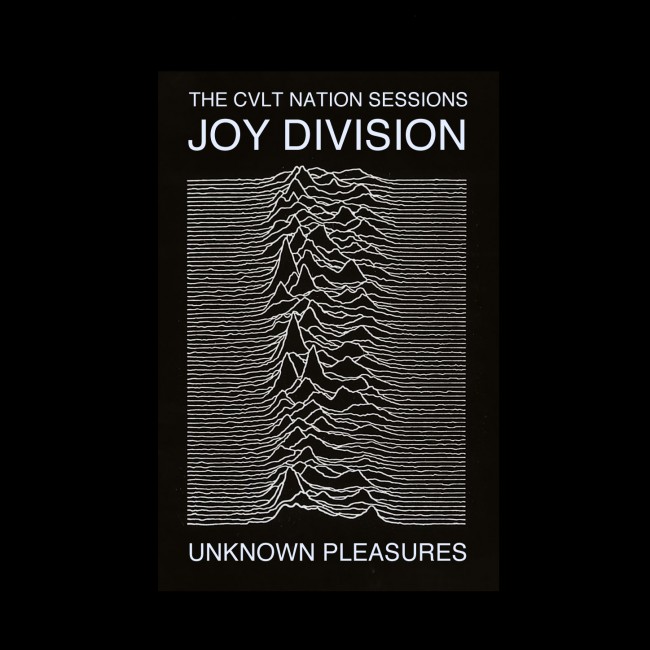
Below are a few more interesting looks at contours and cross contours. Top left is the famous cover of Joy Division's Unknown Pleasures LP designed by Peter Saville. The image was apparently discovered by members of the band in a Cambridge Encyclopedia of Astronomy and was a visualization created by Harold Craft at the Arecibo Radio Observatory describing successive radio wave pulses, presumably observed incoming. The sense of topography created by the line work is astounding.
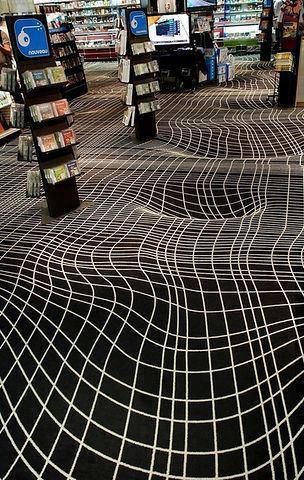
No less astonishing is the apparently flat floor of this Japanese video store. It's an image I picked up online, so can't credit the source, but it's one of those things that you see and just have to snag. Imagine how hard it would be to walk across this flat floor!
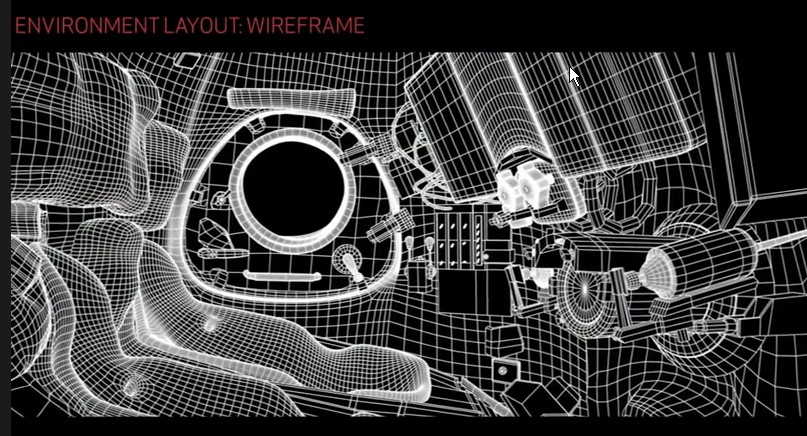
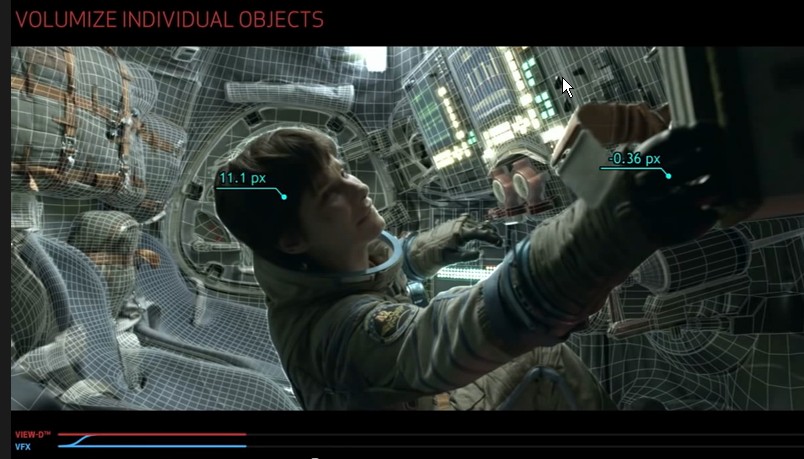
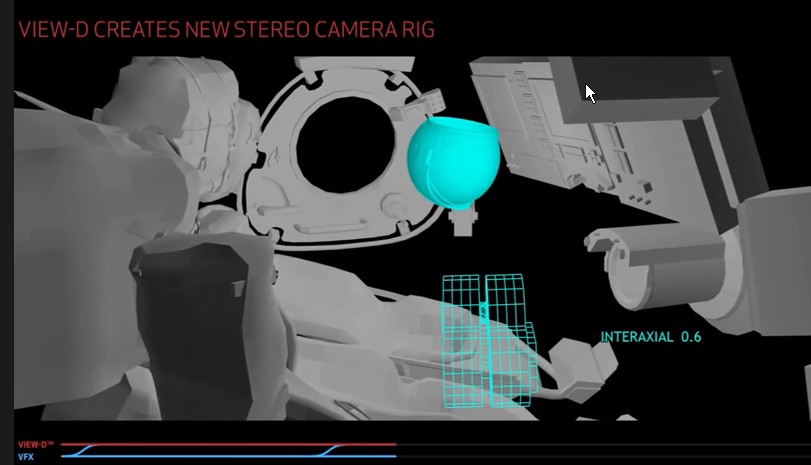
There then follows five images from a vfx breakdown of the interior of a Soyuz capsule from the movie Gravity. I have to point out that I thought the movie was utterly, almost laughably, unbelievable, despite the overwhelming special effects! Nevertheless, the effects were spectacular, and the breakdown shows how it is now more economical and ultimately convincing to create a virtual environment for an actor than to build props and sets (compare the scenes in this sequence to scenes with Astronaut Dave Bowman when shutting down HAL, for example, which were done using sets). And underlying the virtual reality are grids and contours, observable in the first image and partially observable under the textured and rendered surfaces in the following two. In number four we see the capsule and a helmet floating in zero gravity surface rendered, and in the final photo you can see the actor in the virtual capsule with a wire frame rendering of the virtual helmet.
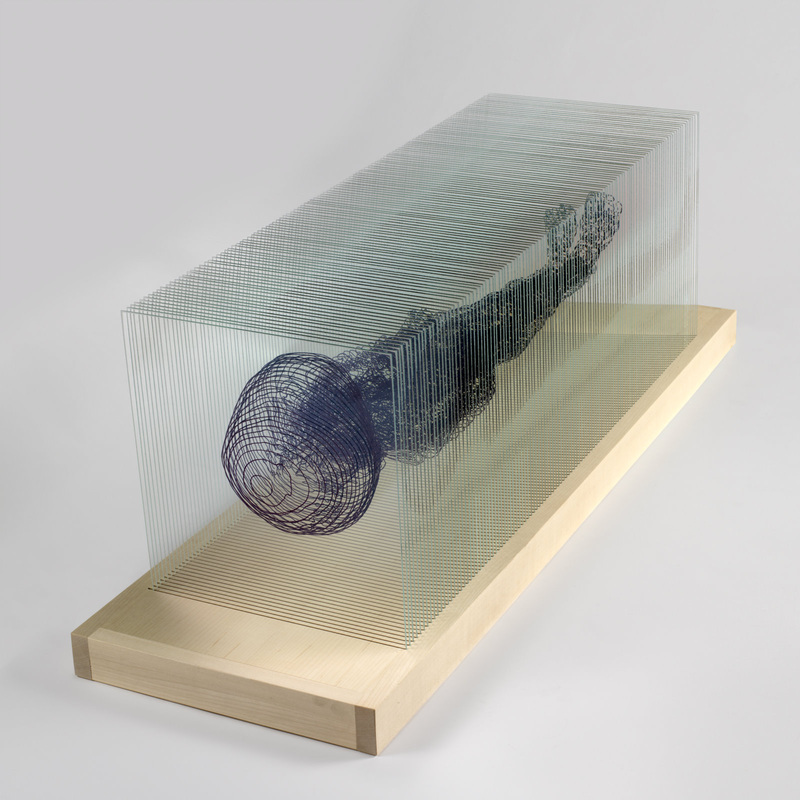
Finally, bottom row, there are two very interesting photos from the website of UK artist Angela Palmer. These are drawings on glass that have been made from CT scans of an Egyptian mummy in the collection of the Ashmolean Museum. Although these are drawings, not sculpture, and linework, not rendering, there is an emergent three dimensional quality that is compelling.
Below are a few more interesting looks at contours and cross contours. Top left is the famous cover of Joy Division's Unknown Pleasures LP designed by Peter Saville. The image was apparently discovered by members of the band in a Cambridge Encyclopedia of Astronomy and was a visualization created by Harold Craft at the Arecibo Radio Observatory describing successive radio wave pulses, presumably observed incoming. The sense of topography created by the line work is astounding.
No less astonishing is the apparently flat floor of this Japanese video store. It's an image I picked up online, so can't credit the source, but it's one of those things that you see and just have to snag. Imagine how hard it would be to walk across this flat floor!
There then follows five images from a vfx breakdown of the interior of a Soyuz capsule from the movie Gravity. I have to point out that I thought the movie was utterly, almost laughably, unbelievable, despite the overwhelming special effects! Nevertheless, the effects were spectacular, and the breakdown shows how it is now more economical and ultimately convincing to create a virtual environment for an actor than to build props and sets (compare the scenes in this sequence to scenes with Astronaut Dave Bowman when shutting down HAL, for example, which were done using sets). And underlying the virtual reality are grids and contours, observable in the first image and partially observable under the textured and rendered surfaces in the following two. In number four we see the capsule and a helmet floating in zero gravity surface rendered, and in the final photo you can see the actor in the virtual capsule with a wire frame rendering of the virtual helmet.
Finally, bottom row, there are two very interesting photos from the website of UK artist Angela Palmer. These are drawings on glass that have been made from CT scans of an Egyptian mummy in the collection of the Ashmolean Museum. Although these are drawings, not sculpture, and linework, not rendering, there is an emergent three dimensional quality that is compelling.


Circle Drawing
It is easy to think of the human form as made from circles and ovoid shapes. Many 'how to' books on drawing, and in particular 'cartooning', use circles as components to construct figures and characters.
In this 'circle drawing' exercise work lightly at first (top left), creating and repeating circles and ovoid shapes 'around' structures in the human form as you perceive them. Become heavier as you become more convinced of the correctness of your drawing. Don't just stick to outline; look for circles within the outline of the form. Keep your crayon to the paper.
Being forced to only draw circles and build up your form with only these constructs should help you to search for and actually see all of the ovoid shapes to be found within the outline of the figure.
Wrap-around Drawing
You can extend the 'circle drawing' experience by using the side of your crayon and imagining it is wrapping layers of cloth around the figure as though creating a mummy. The top right and second row left and middle show examples of this type of drawing. Both circle drawing and wrap around drawing can be effective ways of describing form. Although quicker and more impulsive, they are easy to relate to the carefully constructed contour and cross contour drawings above.
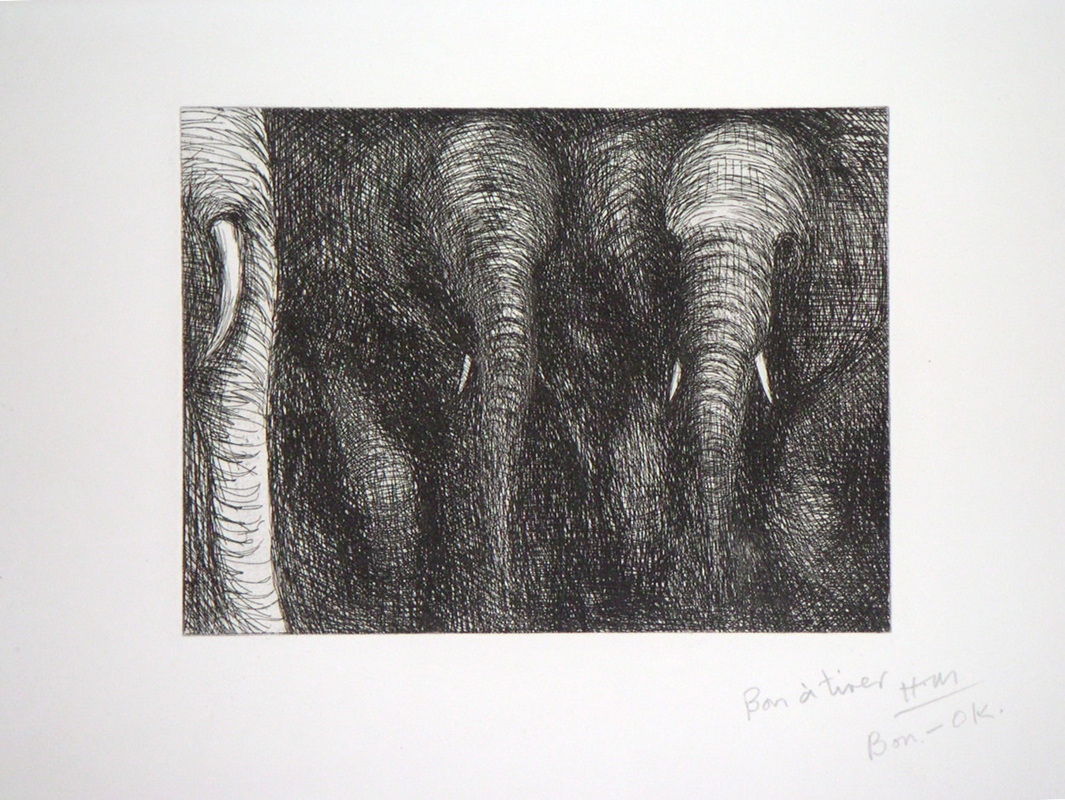
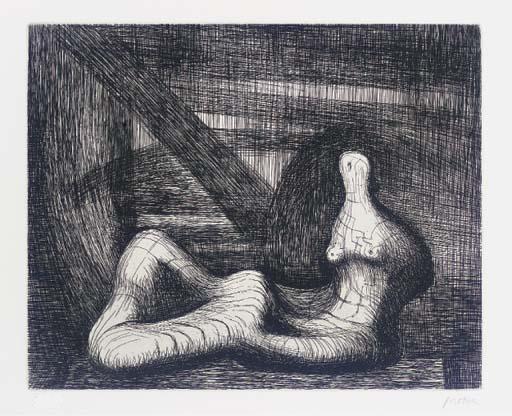
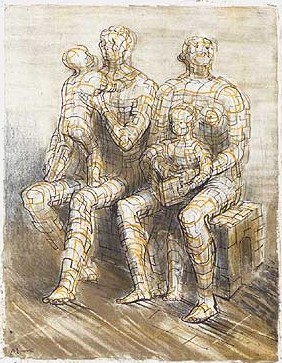
In fact, all of the exercises are related. Each uses a slightly different way to do the same thing: describe form. This is probably why practicing the exercises allows attributes of them to seamless blend into your standard drawing and sketching style. The final four drawings are by the UK sculptor Henry Moore. I spend a lot of time 'down by the Henry Moore' at art college in Toronto, so his sculpture was imprinted on me at a formative age. As well, the Art Gallery of Ontario had an extensive collection of his sculpture and also lithographic prints...drawings of sorts. Moore's drawing style is profoundly sculptural, and if you look at his drawings below you can see much of what we are experimenting with employed in his standard drawing style. Moore apparently spent a lot of time at the London Zoo drawing elephants. I could speculate that drawing these enormous sculptural organic entities might have influenced his developing drawing style. Elephants have course hides with fissures and cracks that follow their form much like contour lines do. Look at the first Moore drawing for evidence of this, and, although there is 'relief' modelling involved (moore, or more on relief modelling later) it is largely the lines themselves that describe form. In the sculpture drawings and the figure drawing of the family Moore, as well as using some relief modelling with shading and chiaroscuro, uses his own unique line work for describing form with contour lines. It's an odd but unique look, almost like the plate metal he must have worked with for some of his sculptures.

Saccade Drawing
Here's a drawing exercise that I've sort of invented myself. Sometimes it has been enjoyed by workshop participants; sometimes not. It relies on a bit of imagination: imagining how your own eyes are actually gathering information.
First an explanation of 'saccades'.
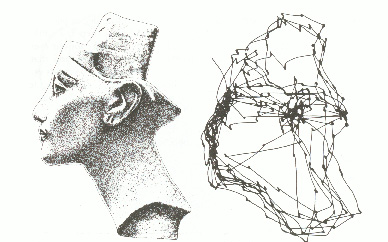
Our eyes and brain, apparently, don't operate like a camera exposing film. An image is projected on the back of the eyes, the retina, but the image isn't transferred to the brain in totality. Our eyes do not in fact stare fixedly at the world taking it all in at once, but make tiny rapid, intermittent movements that briefly halt on areas of interest. We actually see very little in our 'field of vision' clearly, just a small focal point about the size of our thumbnail held at arms length. The eye jerks around in seconds and fractions of seconds across what you are viewing, as does the focal point, and information from that specific area is stored briefly as memory in the brain and then stitched together moments later to provide the illusion of a seamless visual reality. You still can't see the periphery of your vision clearly. Your brain tells you that you can. And can send your eyes left or right and turn your head to confirm that things are where you imagine they are. Researchers can track eye movements over images. This was originally done, I think, by placing mirrors on the retina, bouncing a laser or focused light off the mirrors, and having a subject look at a picture. The laser bounced back and struck a photographic plate that was exposed revealing a drawing of sorts made up of eye movements. Saccades are the jerky movements and stoppages made by the eye.
If we really think about it, most of us can imagine our eyes making these movements.
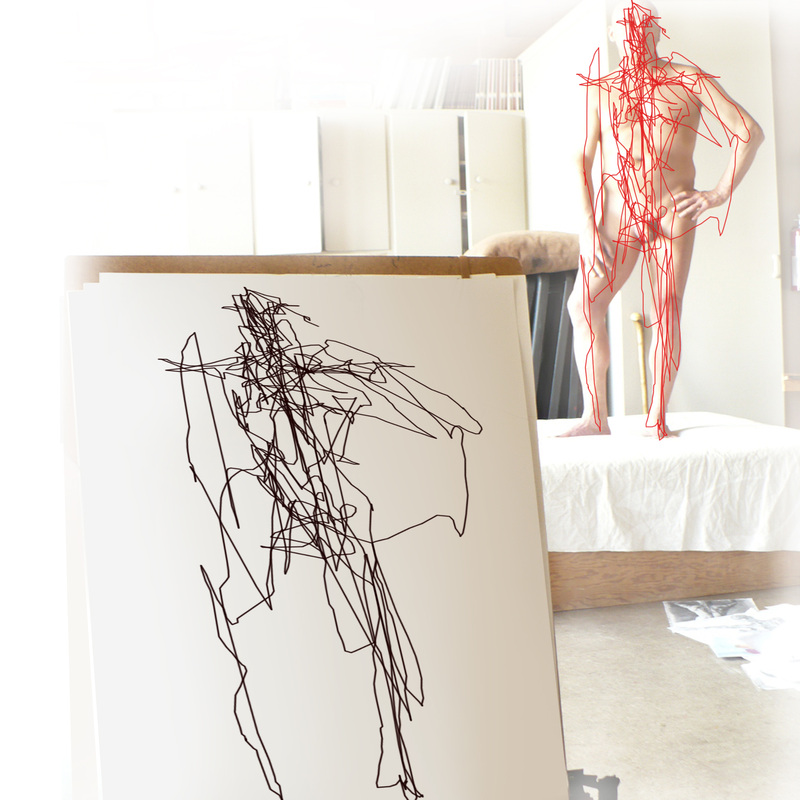
With this in mind, try drawing and imagine that your hand and the crayon are corresponding to your eye movements across the figure. The pose will be around 5 minutes, and to start with, try drawing 'blind'; look at the model only. Your line might be smoother or jerkier, flowing or more ragged, but imagine your figure filling the paper below you and try and hover your crayon on the paper where you imagine the part of the figure is that your eye is currently making fixes on. Below is another fabrication of what the eye might be seeing (red line on figure) with the hand and crayon following the exact movements on the paper.
If your eye and interest suddenly moves elsewhere, without lifting the crayon from the paper, go straight there. Your line work is trying to follow your imagined eye movements.
You aren't trying to force your eyes to look or 'study', as in the contour drawing. You are just trying to follow your eyes with the crayon. Try and be honest about where you are looking. You will probably find that your eyes are lavishing time spent on the face. You will perhaps start there and move back there several times.
As well as the face you might fixate on knees, hands, the groin area is also of interest in the same way that the area from which diverging trunks on a tree are of interest to the eye.
What often isn't of interest, or requires less attention lavished by the eye to comprehend it, is what is between the shoulder and hand, the hip and the ankle. Nevertheless, you might notice that even in these less interesting areas, your eye will make 'stoppages' and you might notice it's those areas where there are joints, complex anatomy with many facets, or planes, on the form.
Again, with this exercise, bear in mind that you aren't thinking about describing outlines. Nor is it a 'tactile' exercise like the contour drawing below. Try and be at the mercy of your eye movements and imagine where they are taking you. A way of thinking of the finished result might be of a 'swarm' of lines collected from trying to follow your eyes. This swarm will get more and more intense and eventually reveal a figure or form.
All of the exercises we have been doing, here and below are, in a sense, deconstructions of the sum of your regular drawing processes. By doing specific exercises that focus on individual aspects of perception and execution we can draw attention to these and heighten our sensory powers in specific areas, hopefully to the benefit of our overall drawing ability.
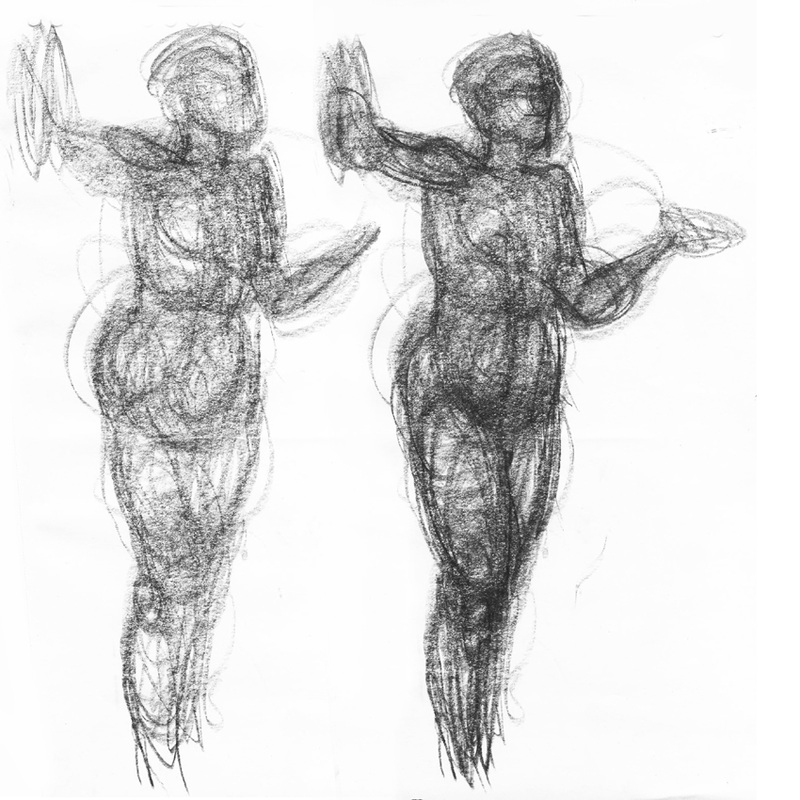
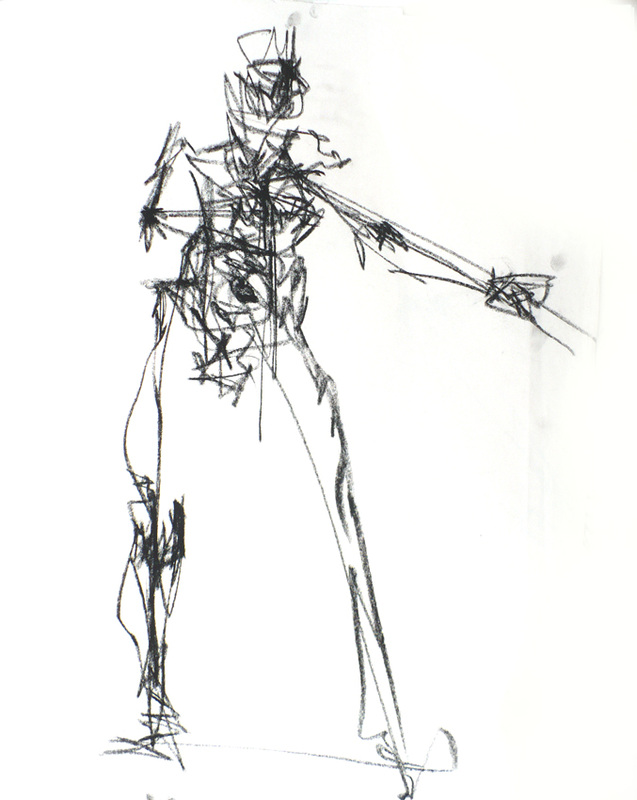
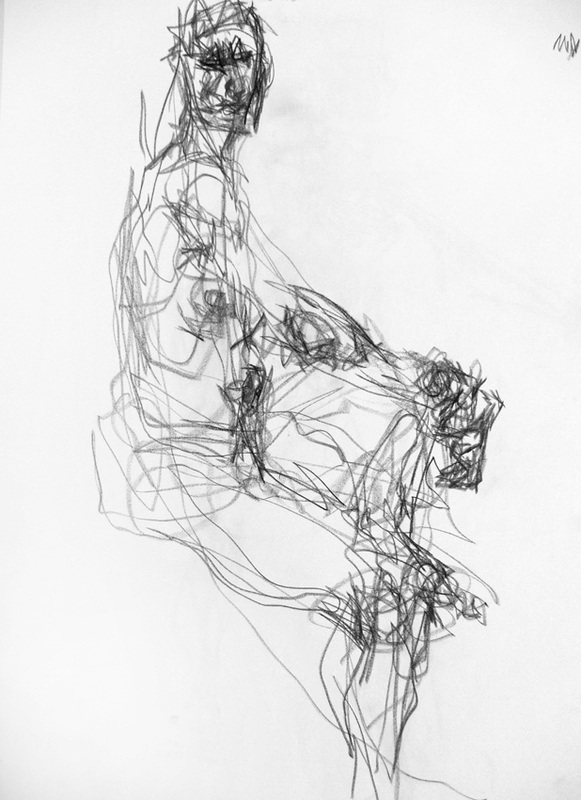
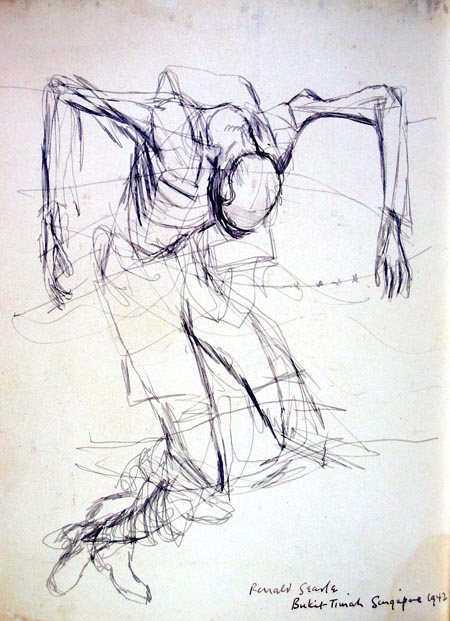
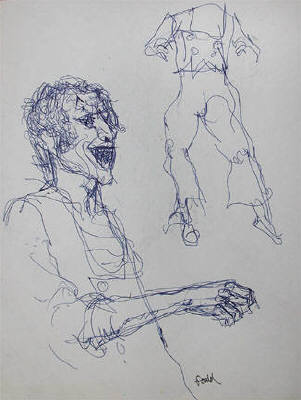
Below are some images related to saccade drawing. First up top row are a couple of illustrations of actual saccade drawings made by the active eye in relation to a drawing. I remember seeing these used in a book on drawing decades ago. Next, far right top row is an image I fabricated to illustrate how a saccade drawing might work when drawing a model. Middle row shows three of my own saccade drawings done from life. The first two were done without looking at the paper. The final three drawings are by Ronald Searle, John Gould and Alberto Giacometti. I've included these to show how saccade drawing might influence your drawing or sketching style. I know nothing of how Giacometti made his drawing, but stylistically there is a hint of sketchy saccade-like drawing. Ronald Searle's drawing depicts a dead prisoner of war strung out on barbed wire where he was presumable gunned down while trying to escape. If Searle had been caught sketching the spectacle he may well have been shot or beaten himself. His sketching style is frantic and saccade-like as he tries to capture what his eyes see. One can imagine him not looking down at his paper for sustained periods and working up a swarm of lines. John Gould was commissioned to draw the mime Marceau Marceau in New York while he performed. He would have had to work frantically to lay information down on his paper. This might be the value of practicing saccade drawing occasionally; like gesture it might inform and improve your sketching style.


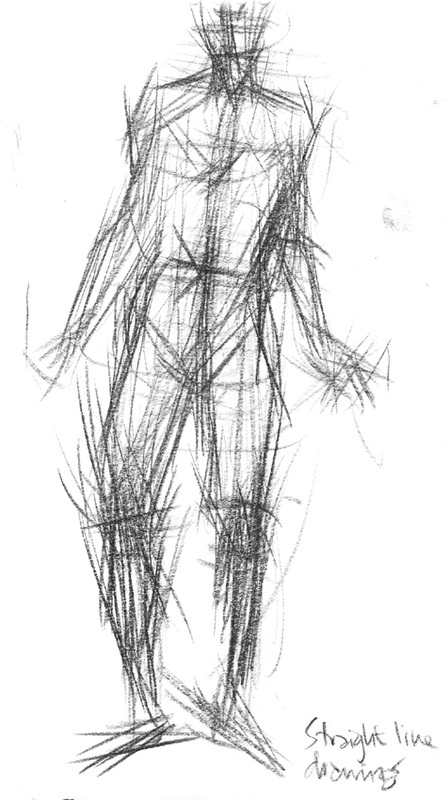
Straight Line Drawing
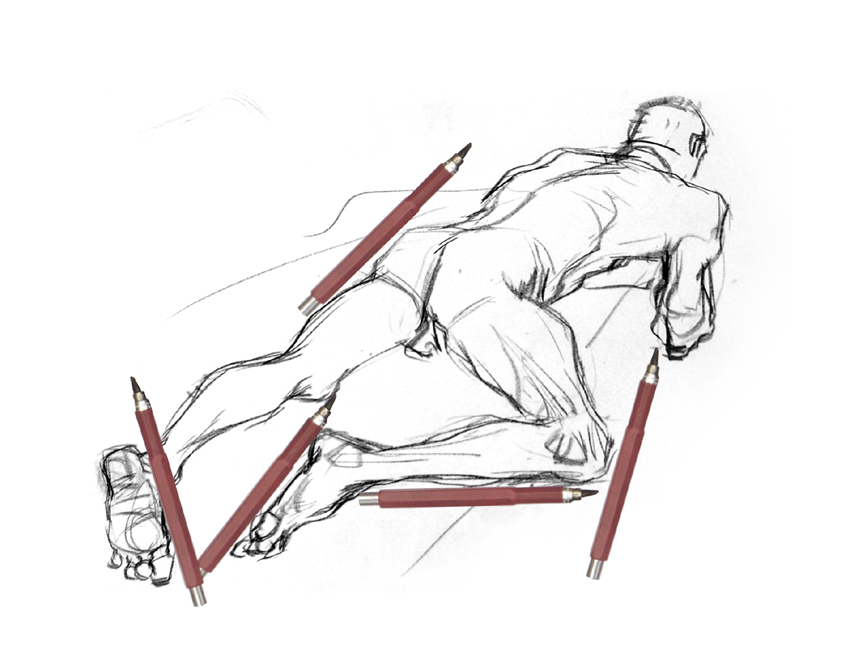
Generally we think of the human form as curvaceous, and so it seems natural to construct it from circles. But what about straight lines? Are there straight lines in the human form, male or female, from which we can construct a drawing? Top left below we can clearly see how if we hold our pencils up to the figure there are many straight lines that become apparent. In the finished sketches that follow you can see how it is possible to construct a figure with straight lines only. For a straight line drawing exercise work quickly and keep slashing away at your paper, lightly at first then heavier and heavier as you become convinced of the correctness of your lines position on the page. You can 'wrap' the lines around corners of the figures outline or around lumpy parts, actually creating apparent curves made out of many straight lines. The line's trajectories will head off into space around the figure, providing possible clues to the inception of ways of visualizing form and space found in the structured drawing and painting method of Cubism.

Measuring Angles and Proportions
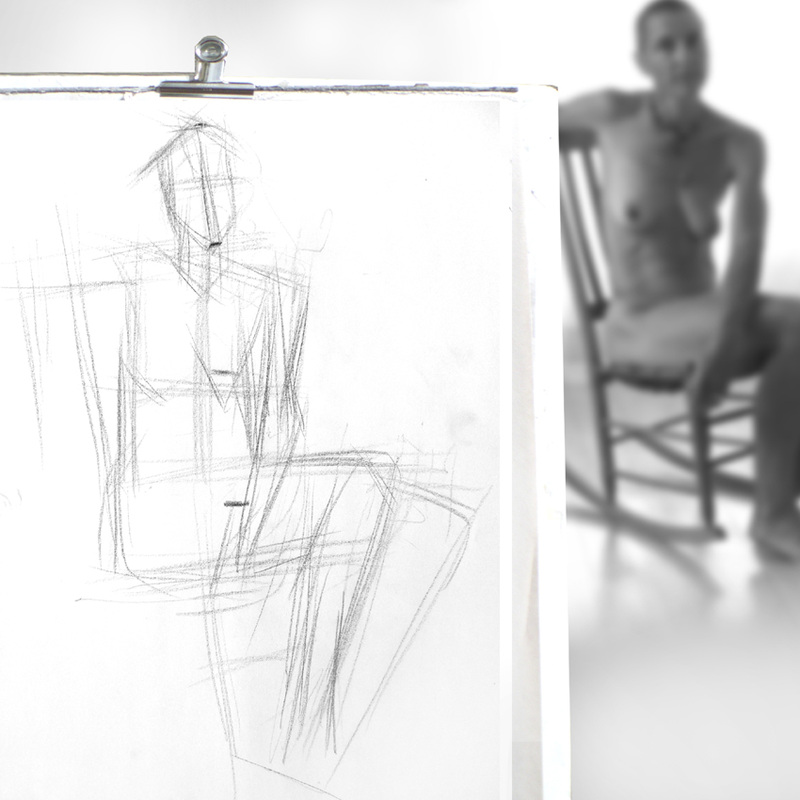
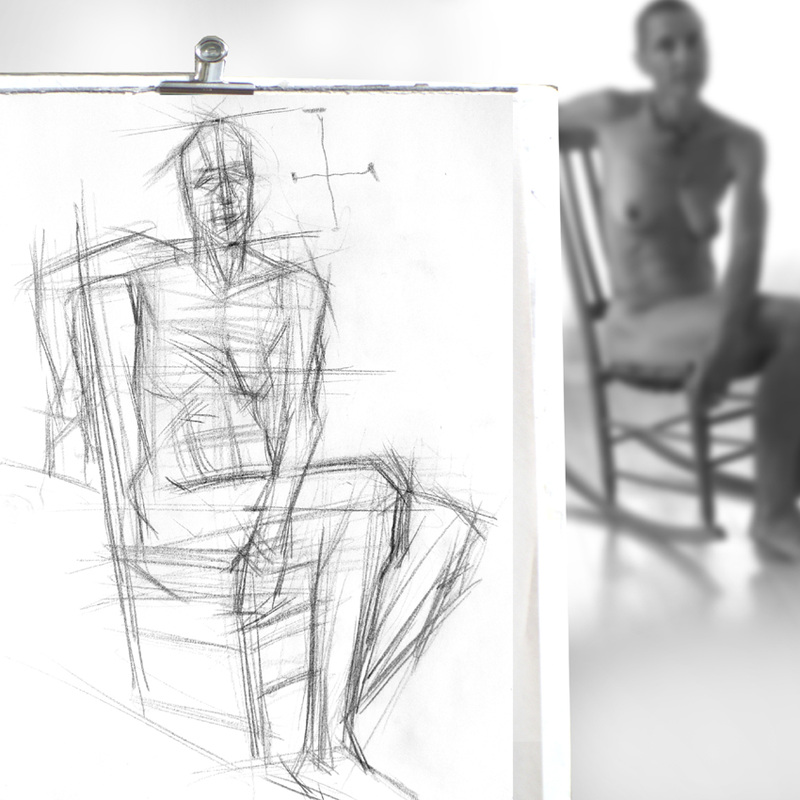
Most of our exercises don't involve carefully constructing a drawing. But knowing how to do so is possibly most valuable asset an artist can have. Measuring angles and proportions is one of the most valuable fundamental drawing skills a visual artist can have, and provides for the eventuality of having to observationally draw with great accuracy. I usually introduce the concept about half way through the first class so that we can practice using it and drawing with it on the longer poses.
Consult the photo below while reviewing how to measure angles and proportions.
The measuring of angles can be done by holding your pencil or crayon holder along the angle you are observing with arms straight and elbows locked; look for perpendicular lines behind your subject and observe the angle of what you intend to draw. Swing your arm to your board and paper and transfer the angle you have taken note of on your paper as you draw. Keep the top or base of the pencil/crayon as the leading edge of your stroke/line. All of the hands in the above image except the two top right are measuring angles on parts the figure. In the image below you can see how you might transfer those angles onto your paper as straight lines.
Measure proportions by measuring one part of the body against another by again, extending your arm, locking your elbows and placing the tip of your pencil at one end of the 'basic unit' that you intend to measure and your thumb down the pencil shaft at the other end. The two top right hands are measuring the height of the head and also it's width. Keeping your arms straight and elbows locked, you can now swing your arms and measure, ie. transfer proportional information from what you see to your drawing. You can measure how many head heights or head widths another body part is, or indeed the whole figure. How many heads high is your figure from your point of view? Roughly measuring the height of the figure in heads before you actually start drawing will help you place your figure on the page where you would like it. You can lightly rough in your measurements before you start drawing, or you can start drawing and then check your measurements.
As well as paying attention to measuring the angles of shapes and outline on and in the figure, also use eyeballing to measure the angle of negative shapes created by body appendages, as well as the background objects behind your model. If we were able to put our model on a platform with a grid taped on the wall behind them, we would find it very useful. There are also perpendicular corners of the room we're in, door jambs, windows, wall moulding and trim, as well as easels and even other course participants. Look closely at the shapes they make around your figure and use them to help ensure accuracy.

Below you can see how your drawing might unfold. You can also see why the 'straight line drawing' exercise is a good lead up to creating an accurate constructed drawing that utilizes a longer pose.
It's worth providing one more description of what it is we are doing. Locking your elbows is extremely important, particularly for the measuring of proportions. If you unlock your elbows and move your pencil toward you during the process of drawing your proportions will run amok. This is because by locking your elbows you create an imaginary surface in front of you at exactly arms length upon which your subject is, in a sense, being 'projected'. Imagine, in fact, that you have a sheet of glass in front of you and that you had a marker and traced your subject on the glass. This would give you a completely accurate drawing. On the glass. Not on your sketch pad where we want it.
So what we are doing is transferring information from that imaginary projection on the transparent plane in front of us, across to our paper. The angles are easiest. We just swing our arms across and transfer the angle we have measure with the crayon or pencil.
The proportions are a bit tougher to get our head around, I often discover someone who has drawn a perfectly accurate but tiny drawing in the centre of their page. This isn't 'wrong', but it is unfortunate, because it's small and surrounded by space.
What the artist has done is measured [proportions with their pencil as though it were a ruler. As a result, they might 'measure' the head off at 1/2 an inch, and transfer that measurement to the paper resulting in a tiny half inch long head.
What we really should be doing is measuring the proportion of one part of the body to another. What we really want to do is decide how much of our page we want to fill. Most of it, hopefully. We then measure the head described above, and count off how many heads high our figure is. We rough in a head, guess it's size on our paper. We count off 5 and one half heads...or whatever we have measured for our figure tip to tail...and see if it fits appropriately. Doesn't fit the paper? Make your head size a bit smaller. Too much space at the bottom? Make the head size a bit bigger. Now you have the head placed in such a way that the rest of your figure should fall into place. How wide is the head? Take a measurement of the width of the head and compare it to the height of the head. It comes just above the eyes on the lower forehead. If you are looking straight at the face the eyes will be exactly between the top and bottom of the head. So you now can measure the width of the head from there and draw the edge of the face appropriately. See below for how a constructed drawing might unfold.
Measuring angles and proportions is extremely valuable because our brains lie to us. We can never trust what we think we see. There are an enormous number of optical illusions we fall prey to. Magicians use the limitations to our vision, limitations our brains deny exist, by suggesting that 'seeing is believing'.
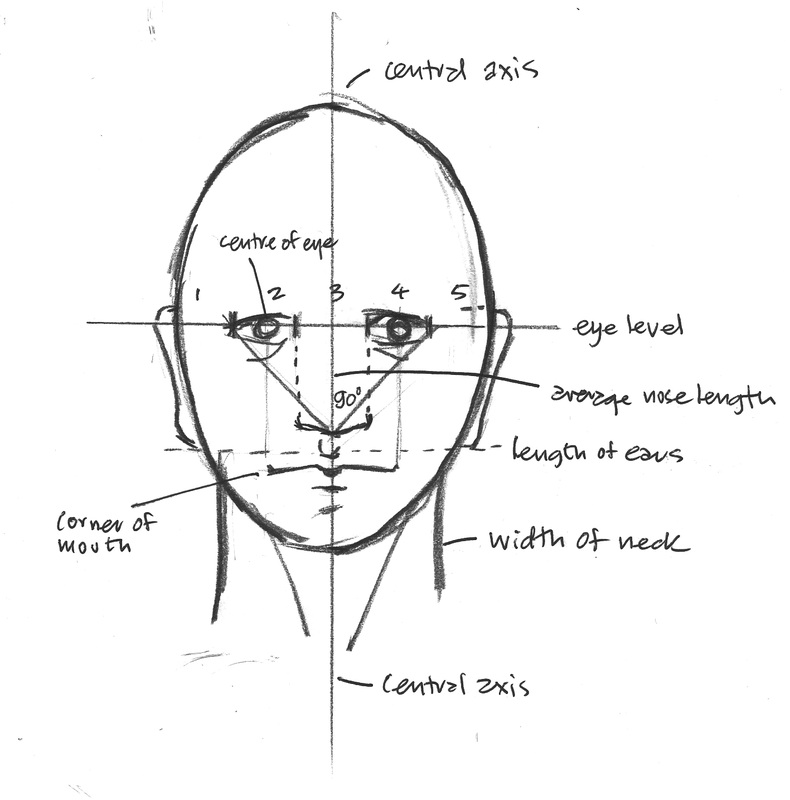
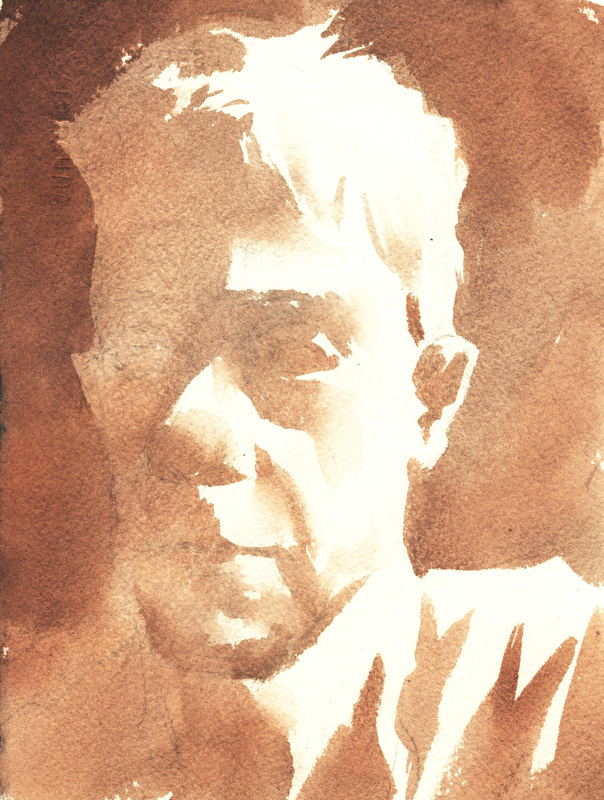
For example, look at your neighbours face and measure the distance between the chin and the eyes and the top of the head and the eyes. Perhaps surprisingly you will find this is exactly the same. It's actually quite convenient for drawing, as, in a full frontal view without any foreshortening it makes placement of the eyes easy. You can see this in a rough diagram of a face on the left below.
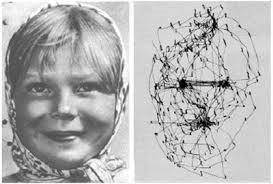
But we don't have a natural tendency to place the eyes in the middle; most of us naturally tend to place the eyes nearer the top of the head and the mouth nearer the chin. The forehead and chin is of little interest to us. This can be shown by looking at a the movement of eye saccades placed over a face. This is probably the result of plotting a few seconds of eye movements over a face and you can see how hungry the eyes are for information about eyes, and also the mouth. This is the triangle we constantly survey when staring at the faces of other humans. This is where, as social animals, we glean information about the emotional state and intention of our fellow humans. Are they happy? Pissed off? Friend? Foe? Can we attempt to mate?! Evolution has no doubt had a lot to do with our fixation with this part of the body and face.
For example, look at your neighbours face and measure the distance between the chin and the eyes and the top of the head and the eyes. Perhaps surprisingly you will find this is exactly the same. It's actually quite convenient for drawing, as, in a full frontal view without any foreshortening it makes placement of the eyes easy. You can see this in a rough diagram of a face on the left below.
But we don't have a natural tendency to place the eyes in the middle; most of us naturally tend to place the eyes nearer the top of the head and the mouth nearer the chin. The forehead and chin is of little interest to us. This can be shown by looking at a the movement of eye saccades placed over a face. This is probably the result of plotting a few seconds of eye movements over a face and you can see how hungry the eyes are for information about eyes, and also the mouth. This is the triangle we constantly survey when staring at the faces of other humans. This is where, as social animals, we glean information about the emotional state and intention of our fellow humans. Are they happy? Pissed off? Friend? Foe? Can we attempt to mate?! Evolution has no doubt had a lot to do with our fixation with this part of the body and face.


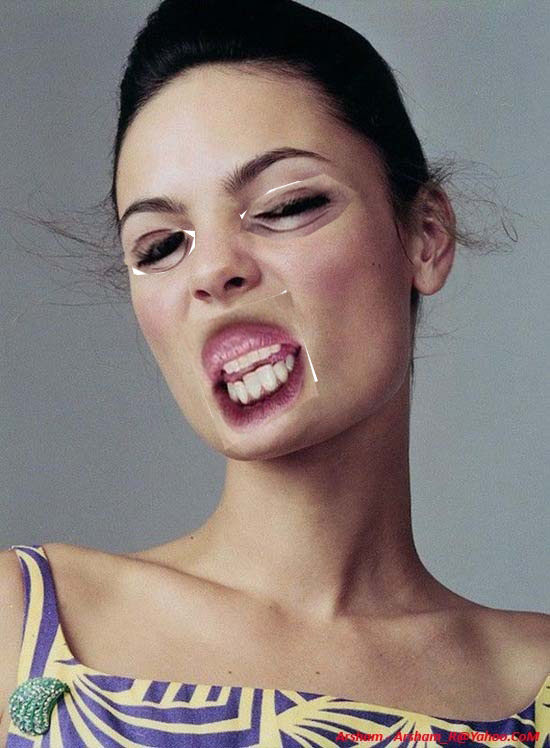
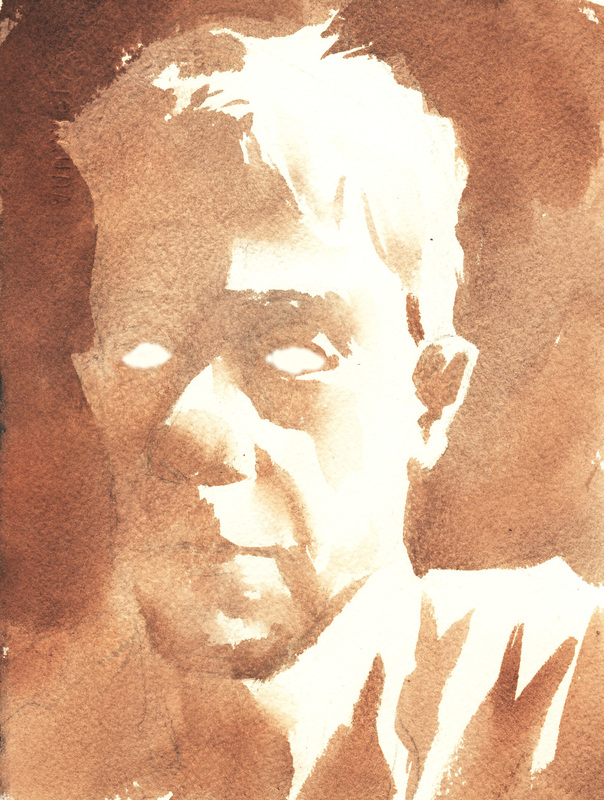
If you would like to disturb and unsettle yourself, look at a familiar face upside down. It looks quite alien, a strange collection of other worldly orifices and sphincters. It might make an interesting exercise to draw an upside down face at some point in the course, or on your own at home.
A lot of illustrators and artists using collage often put upside down mouths and eyes on right side up faces. The effect is also disconcerting, although slightly less so than a fully upside down face. I've done just that with the admittedly sneering fashion model in the first two photos below.
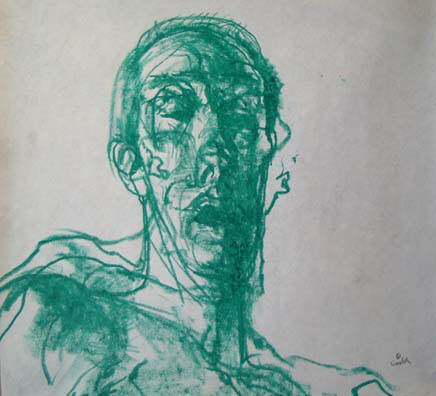
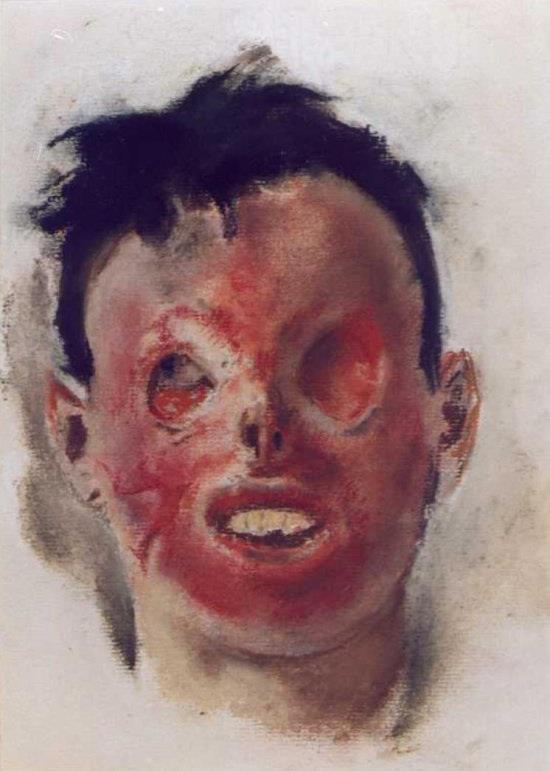
More disconcerting, and also profoundly tragic, is the phenomenon of disfigurement. The far right of the top row shows a WW2 artist's rendering of the profoundly burned face of an airman. The face...always a mask of sorts...has been terribly altered. As with all disfigurement, it would be hopeless to argue that it doesn't unsettle us. However, people who find themselves disfigured must be deeply relieved when they can interact with another human who doesn't stare or look shocked at their appearance. Scarring and disfigurement anywhere else on the body does not have the effect as when it occurs on the face. I have spent a lot of time on these pages considering how little we actually see. It would seem that this sensitivity to disfigurement of the face might prove the opposite, that we have powerful visual abilities. We do have great visual abilities in some respects; we are capable of recognition, for example recognizing single faces (but we are not able to recall, to generate a face we have seen) amongst thousands of faces, an incredible accomplishment. The brain seems to store enough information for recognition but not enough for total recall that might enable us to recreate a face from memory. I have known my wife for almost 50 years, but I simply cannot recreate her face from memory in a drawing. It is as though the brain, in garnering it's resources to focus on one area of the face is shocked when when that area is disrupted in any major way. I'm not sure if I have explained anything at all correctly here, but it is worth considering this sort of thing to understand some of our responses to visual art and human culture. Consider how poorly we often treat physically unattractive people. Consider how often antagonists in film, television and art are depicted as unattractive, with disfigured or unsymmetrical faces.
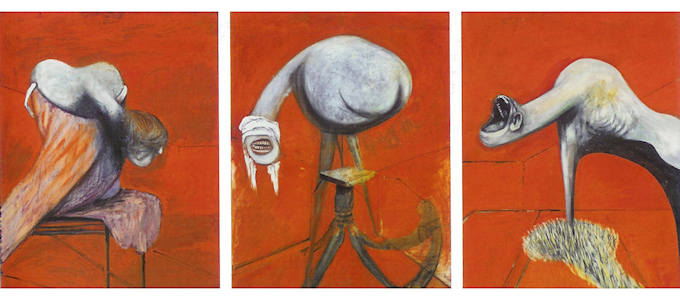
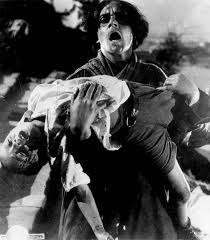
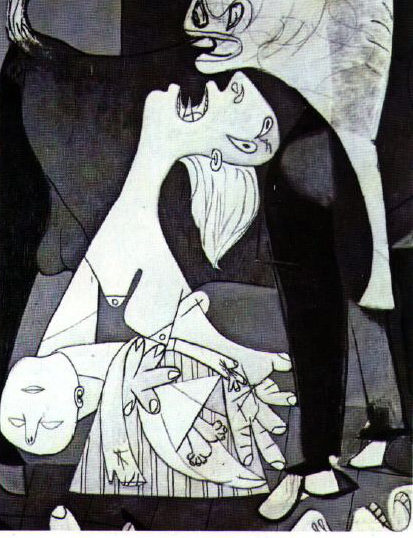
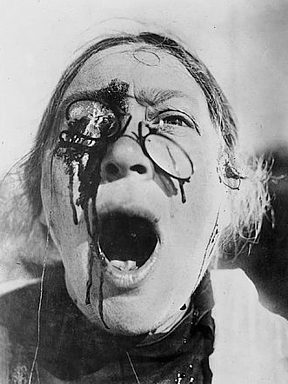
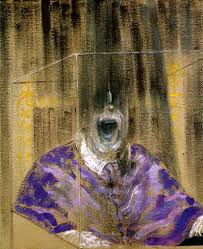
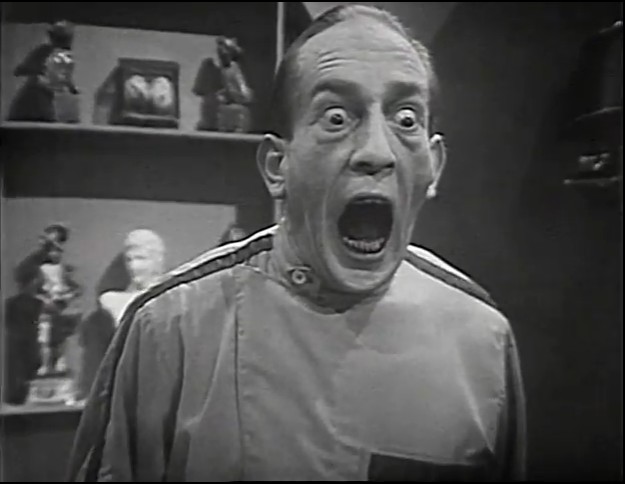
In the left image on the middle row you can see how painter Francis Bacon has depicted the distorted mouth of one of his three figures before a crucifixion. A screaming open mouth might, in and of itself, be enough to disturb us because it seen so rarely and disfigures and disrupts the part of the face we are most sensitive to. In Battleship Potemkin, Sergei Eisenstein's 1925 movie, there are a number of screaming gaping mouths in montage sequences on the Odessa steps, disturbing enough on their own; you can see the face and open mouth of the child is upside down and especially disturbing, middle second row. So disturbing that Picasso, when painting Guernica, almost certainly referenced the film scene. Francis Bacon repeatedly referenced the screaming face of a wounded nurse mowed down by soldiers on the Odessa Steps (bottom left), in his series of figures based on Velázquez’s portrait of Pope Innocent X as well as in many portraits, middle bottom row. I'd wager that the director of the 1960's Dr. Who episodes 'Fury from the Deep' referenced Bacon, bottom right. But all them are utilizing the fact that disruption of the face disturbs and begs our attention.
Well, that was a major digression from the premise that we have to measure angles and proportions because our brain lies to us, but all of it at least deals with attributes of the human figure; the face, which is our subject for this course.
A lot of illustrators and artists using collage often put upside down mouths and eyes on right side up faces. The effect is also disconcerting, although slightly less so than a fully upside down face. I've done just that with the admittedly sneering fashion model in the first two photos below.
More disconcerting, and also profoundly tragic, is the phenomenon of disfigurement. The far right of the top row shows a WW2 artist's rendering of the profoundly burned face of an airman. The face...always a mask of sorts...has been terribly altered. As with all disfigurement, it would be hopeless to argue that it doesn't unsettle us. However, people who find themselves disfigured must be deeply relieved when they can interact with another human who doesn't stare or look shocked at their appearance. Scarring and disfigurement anywhere else on the body does not have the effect as when it occurs on the face. I have spent a lot of time on these pages considering how little we actually see. It would seem that this sensitivity to disfigurement of the face might prove the opposite, that we have powerful visual abilities. We do have great visual abilities in some respects; we are capable of recognition, for example recognizing single faces (but we are not able to recall, to generate a face we have seen) amongst thousands of faces, an incredible accomplishment. The brain seems to store enough information for recognition but not enough for total recall that might enable us to recreate a face from memory. I have known my wife for almost 50 years, but I simply cannot recreate her face from memory in a drawing. It is as though the brain, in garnering it's resources to focus on one area of the face is shocked when when that area is disrupted in any major way. I'm not sure if I have explained anything at all correctly here, but it is worth considering this sort of thing to understand some of our responses to visual art and human culture. Consider how poorly we often treat physically unattractive people. Consider how often antagonists in film, television and art are depicted as unattractive, with disfigured or unsymmetrical faces.
In the left image on the middle row you can see how painter Francis Bacon has depicted the distorted mouth of one of his three figures before a crucifixion. A screaming open mouth might, in and of itself, be enough to disturb us because it seen so rarely and disfigures and disrupts the part of the face we are most sensitive to. In Battleship Potemkin, Sergei Eisenstein's 1925 movie, there are a number of screaming gaping mouths in montage sequences on the Odessa steps, disturbing enough on their own; you can see the face and open mouth of the child is upside down and especially disturbing, middle second row. So disturbing that Picasso, when painting Guernica, almost certainly referenced the film scene. Francis Bacon repeatedly referenced the screaming face of a wounded nurse mowed down by soldiers on the Odessa Steps (bottom left), in his series of figures based on Velázquez’s portrait of Pope Innocent X as well as in many portraits, middle bottom row. I'd wager that the director of the 1960's Dr. Who episodes 'Fury from the Deep' referenced Bacon, bottom right. But all them are utilizing the fact that disruption of the face disturbs and begs our attention.
Well, that was a major digression from the premise that we have to measure angles and proportions because our brain lies to us, but all of it at least deals with attributes of the human figure; the face, which is our subject for this course.

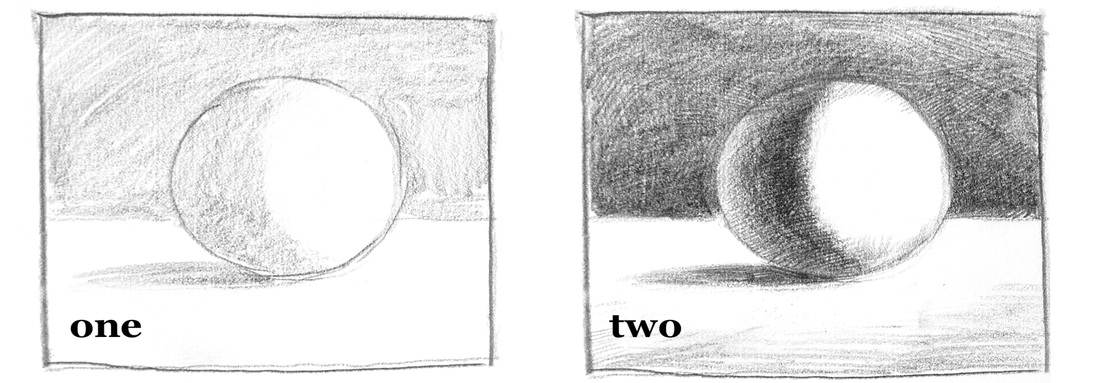
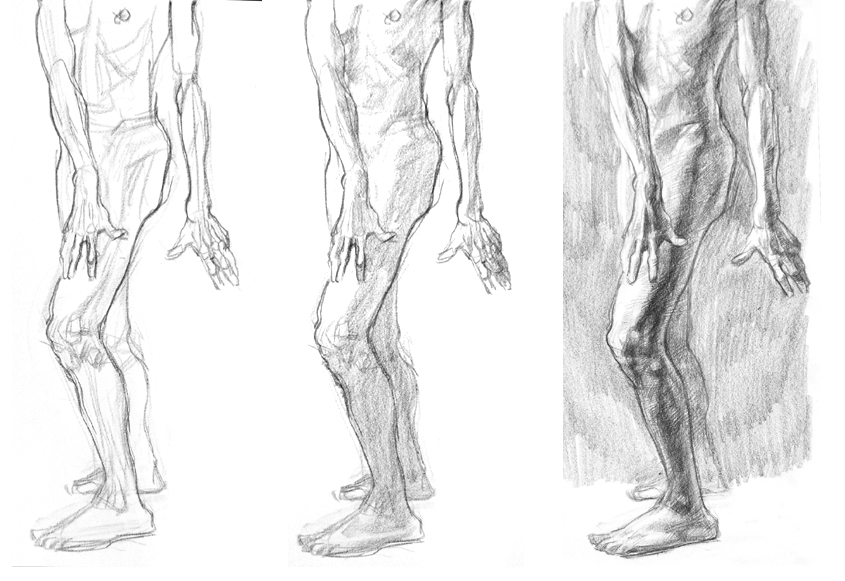
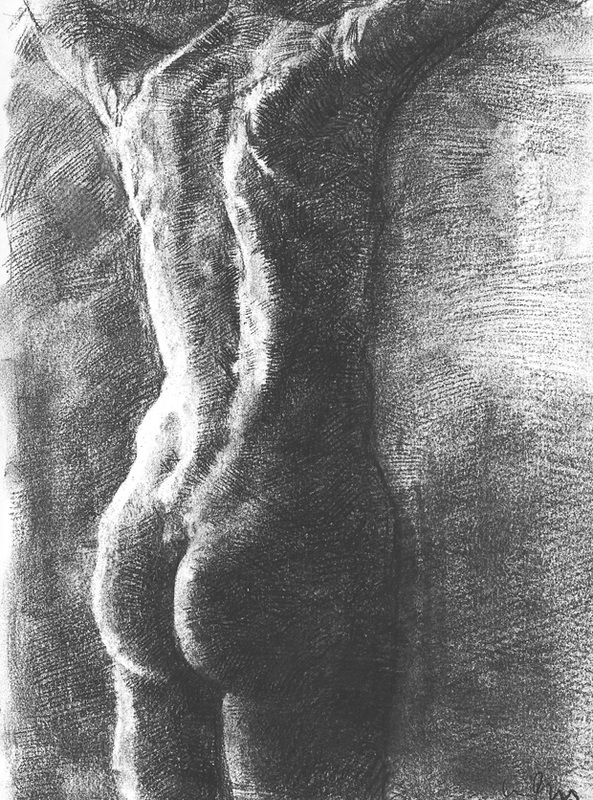
Light and Shade on Form
Now it is time to leave line behind, somewhat, and start to describe the effect of light and shade on form.


Memory Drawing.
I'm leaving putting this exercise at the bottom of the page, but it may well be the first exercise we do. We will do it to prove how little we actually see, and see and remember.
I remember doing this exercise in life drawing in school. There was no explanation of exactly what the exercise would do for us, and I'm still not sure it does anything to help us with learning how to observationally draw. Or draw in general. When I did the exercise, I was horrified at how little I could remember. I was appalled that I apparently had very little recall, and felt profoundly deficient. I was worried there was something seriously wrong with me or something seriously lacking in my visual abilities.
What this exercise is intended to do for us is to show how little we see and how little of what we see is remembered. There is, apparently, no such thing as photographic memory.
